In detail
Everything that didn't fit on the homepage.
The full feature set, the fourteen experience values one by one, our recommendation for clean profiles, the technology behind it — and, for filament manufacturers, company mode.
Chapter 1 · Getting started
Your first filament, step by step.
From the first click to a profile sitting in every slicer. Half an hour, then it just works.

Step 1 of 7
Import from your slicer
One button, top right: "Import from slicer". That's how it all starts. FilamentPilot works with what's already on your computer — no account, no setup, no preparation.
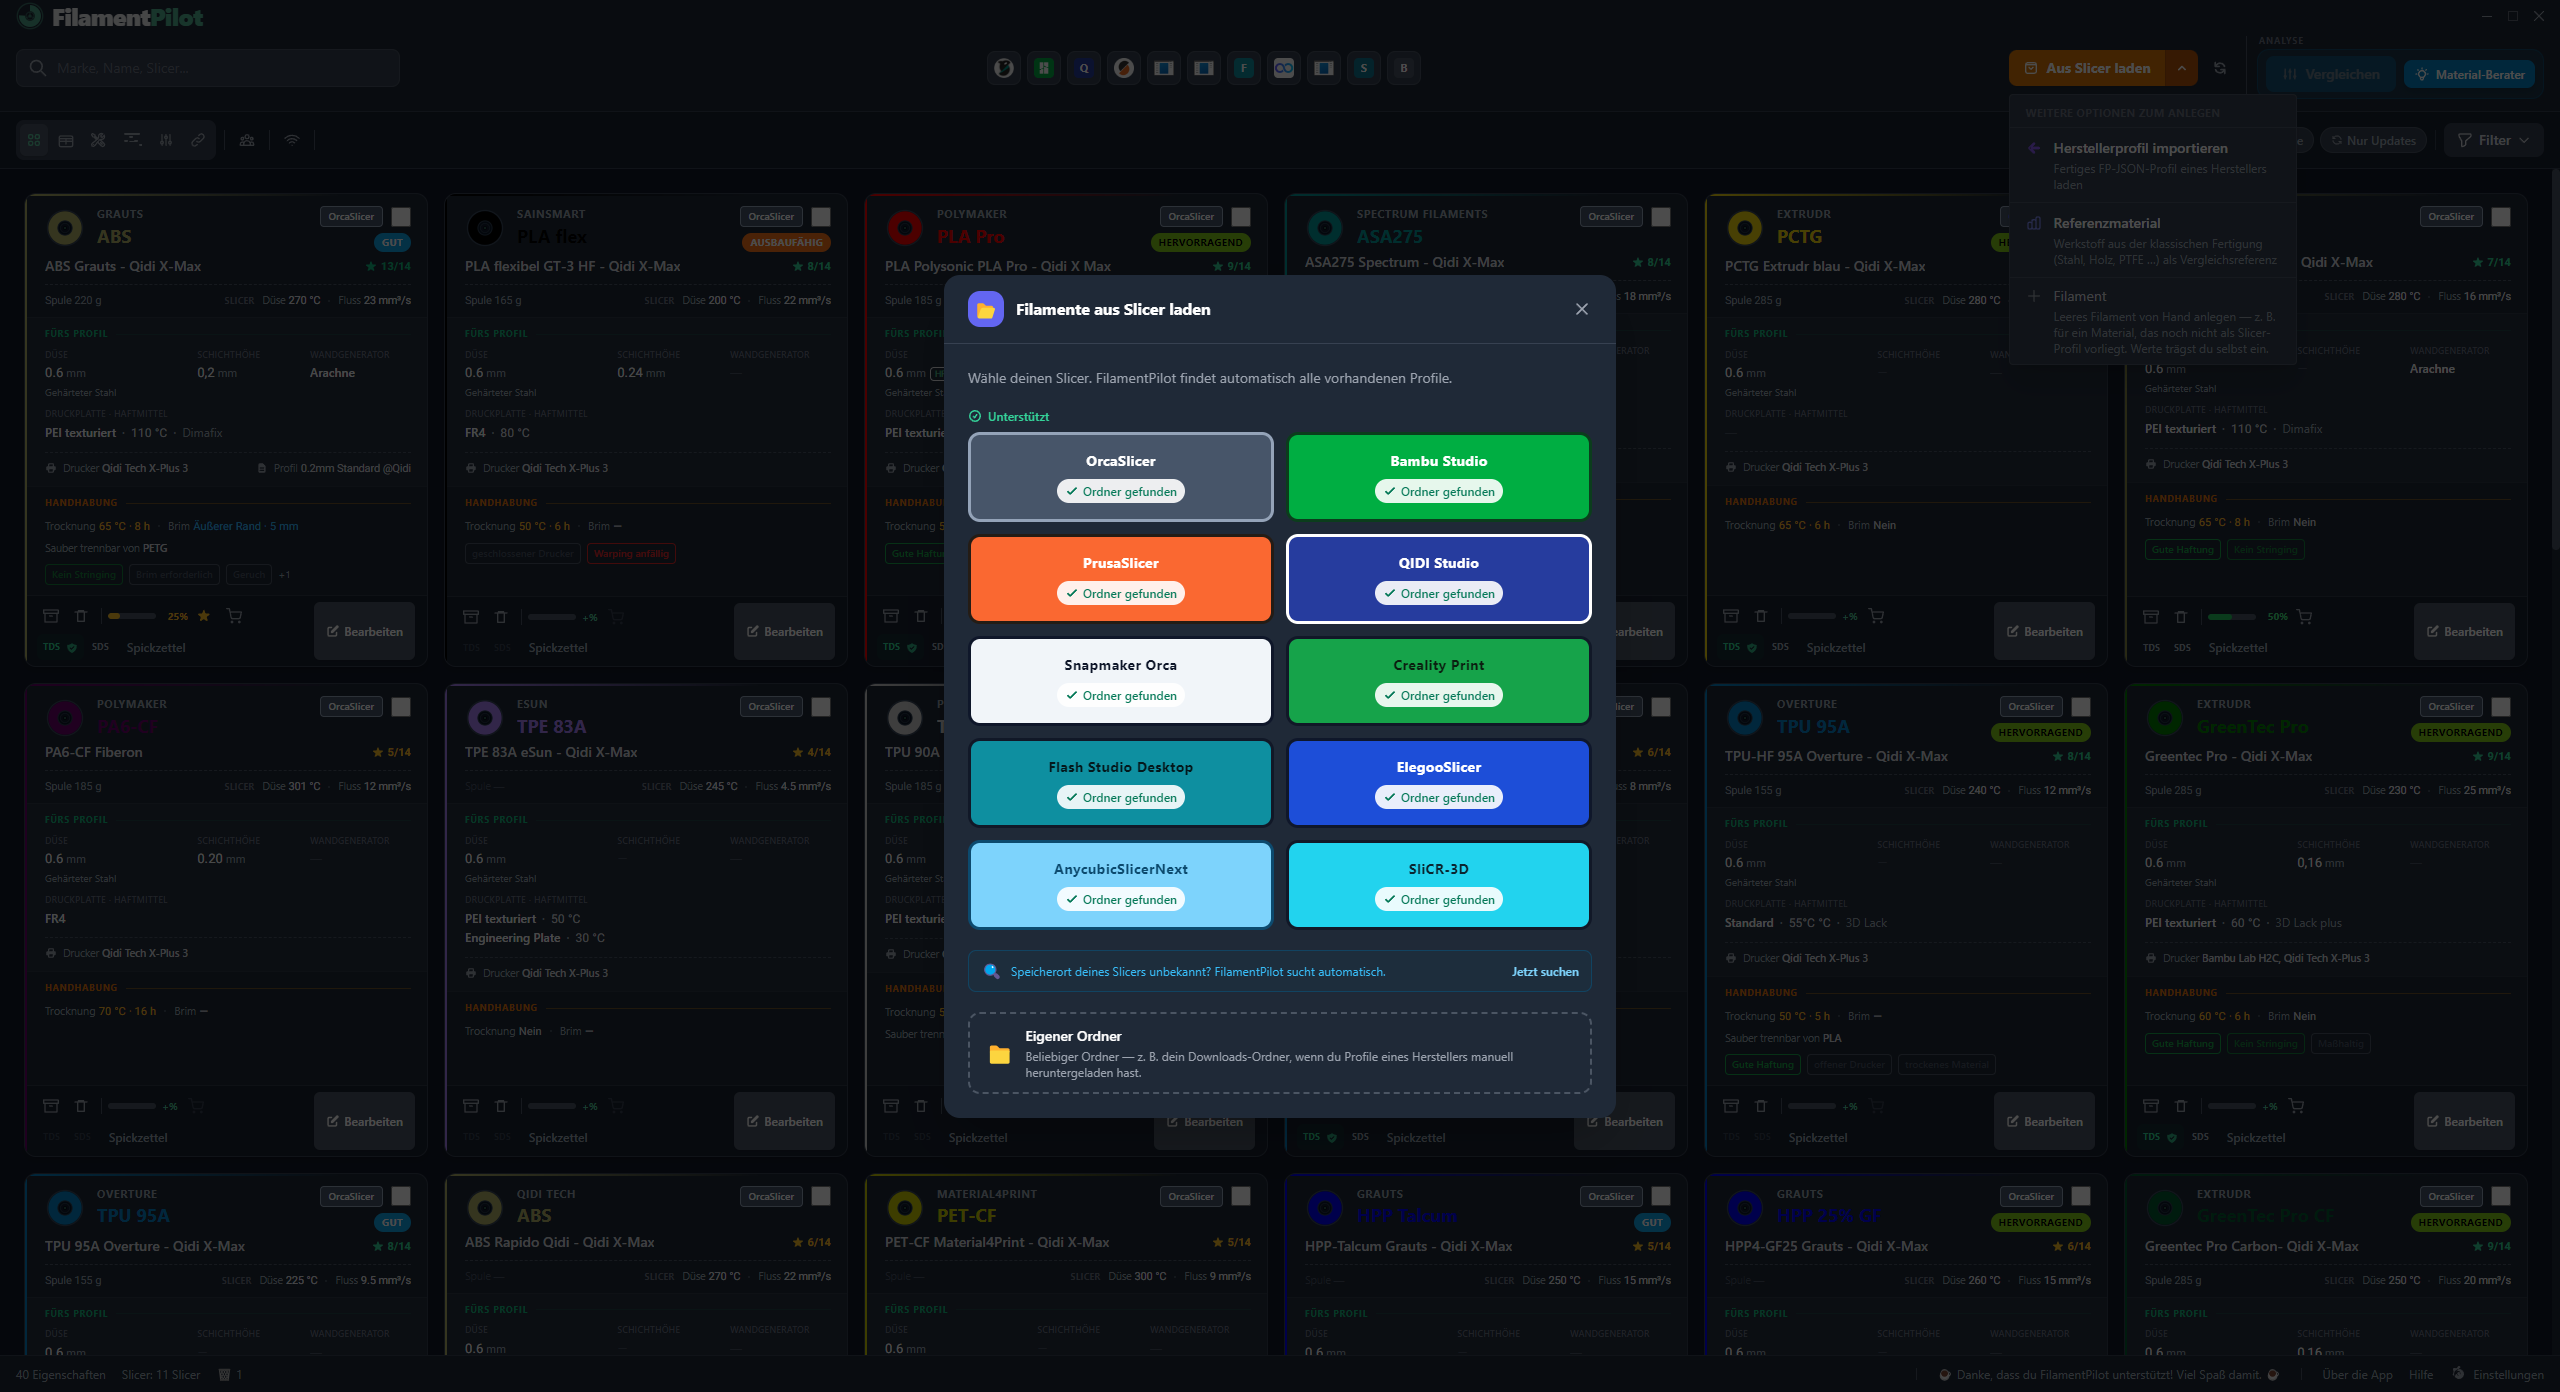
Step 2 of 7
Pick your program
FilamentPilot shows you which slicers it found and remembers where their profiles live. If yours is missing, it searches for it itself at the press of a button — including variants like Snapmaker Orca or Creality Print.
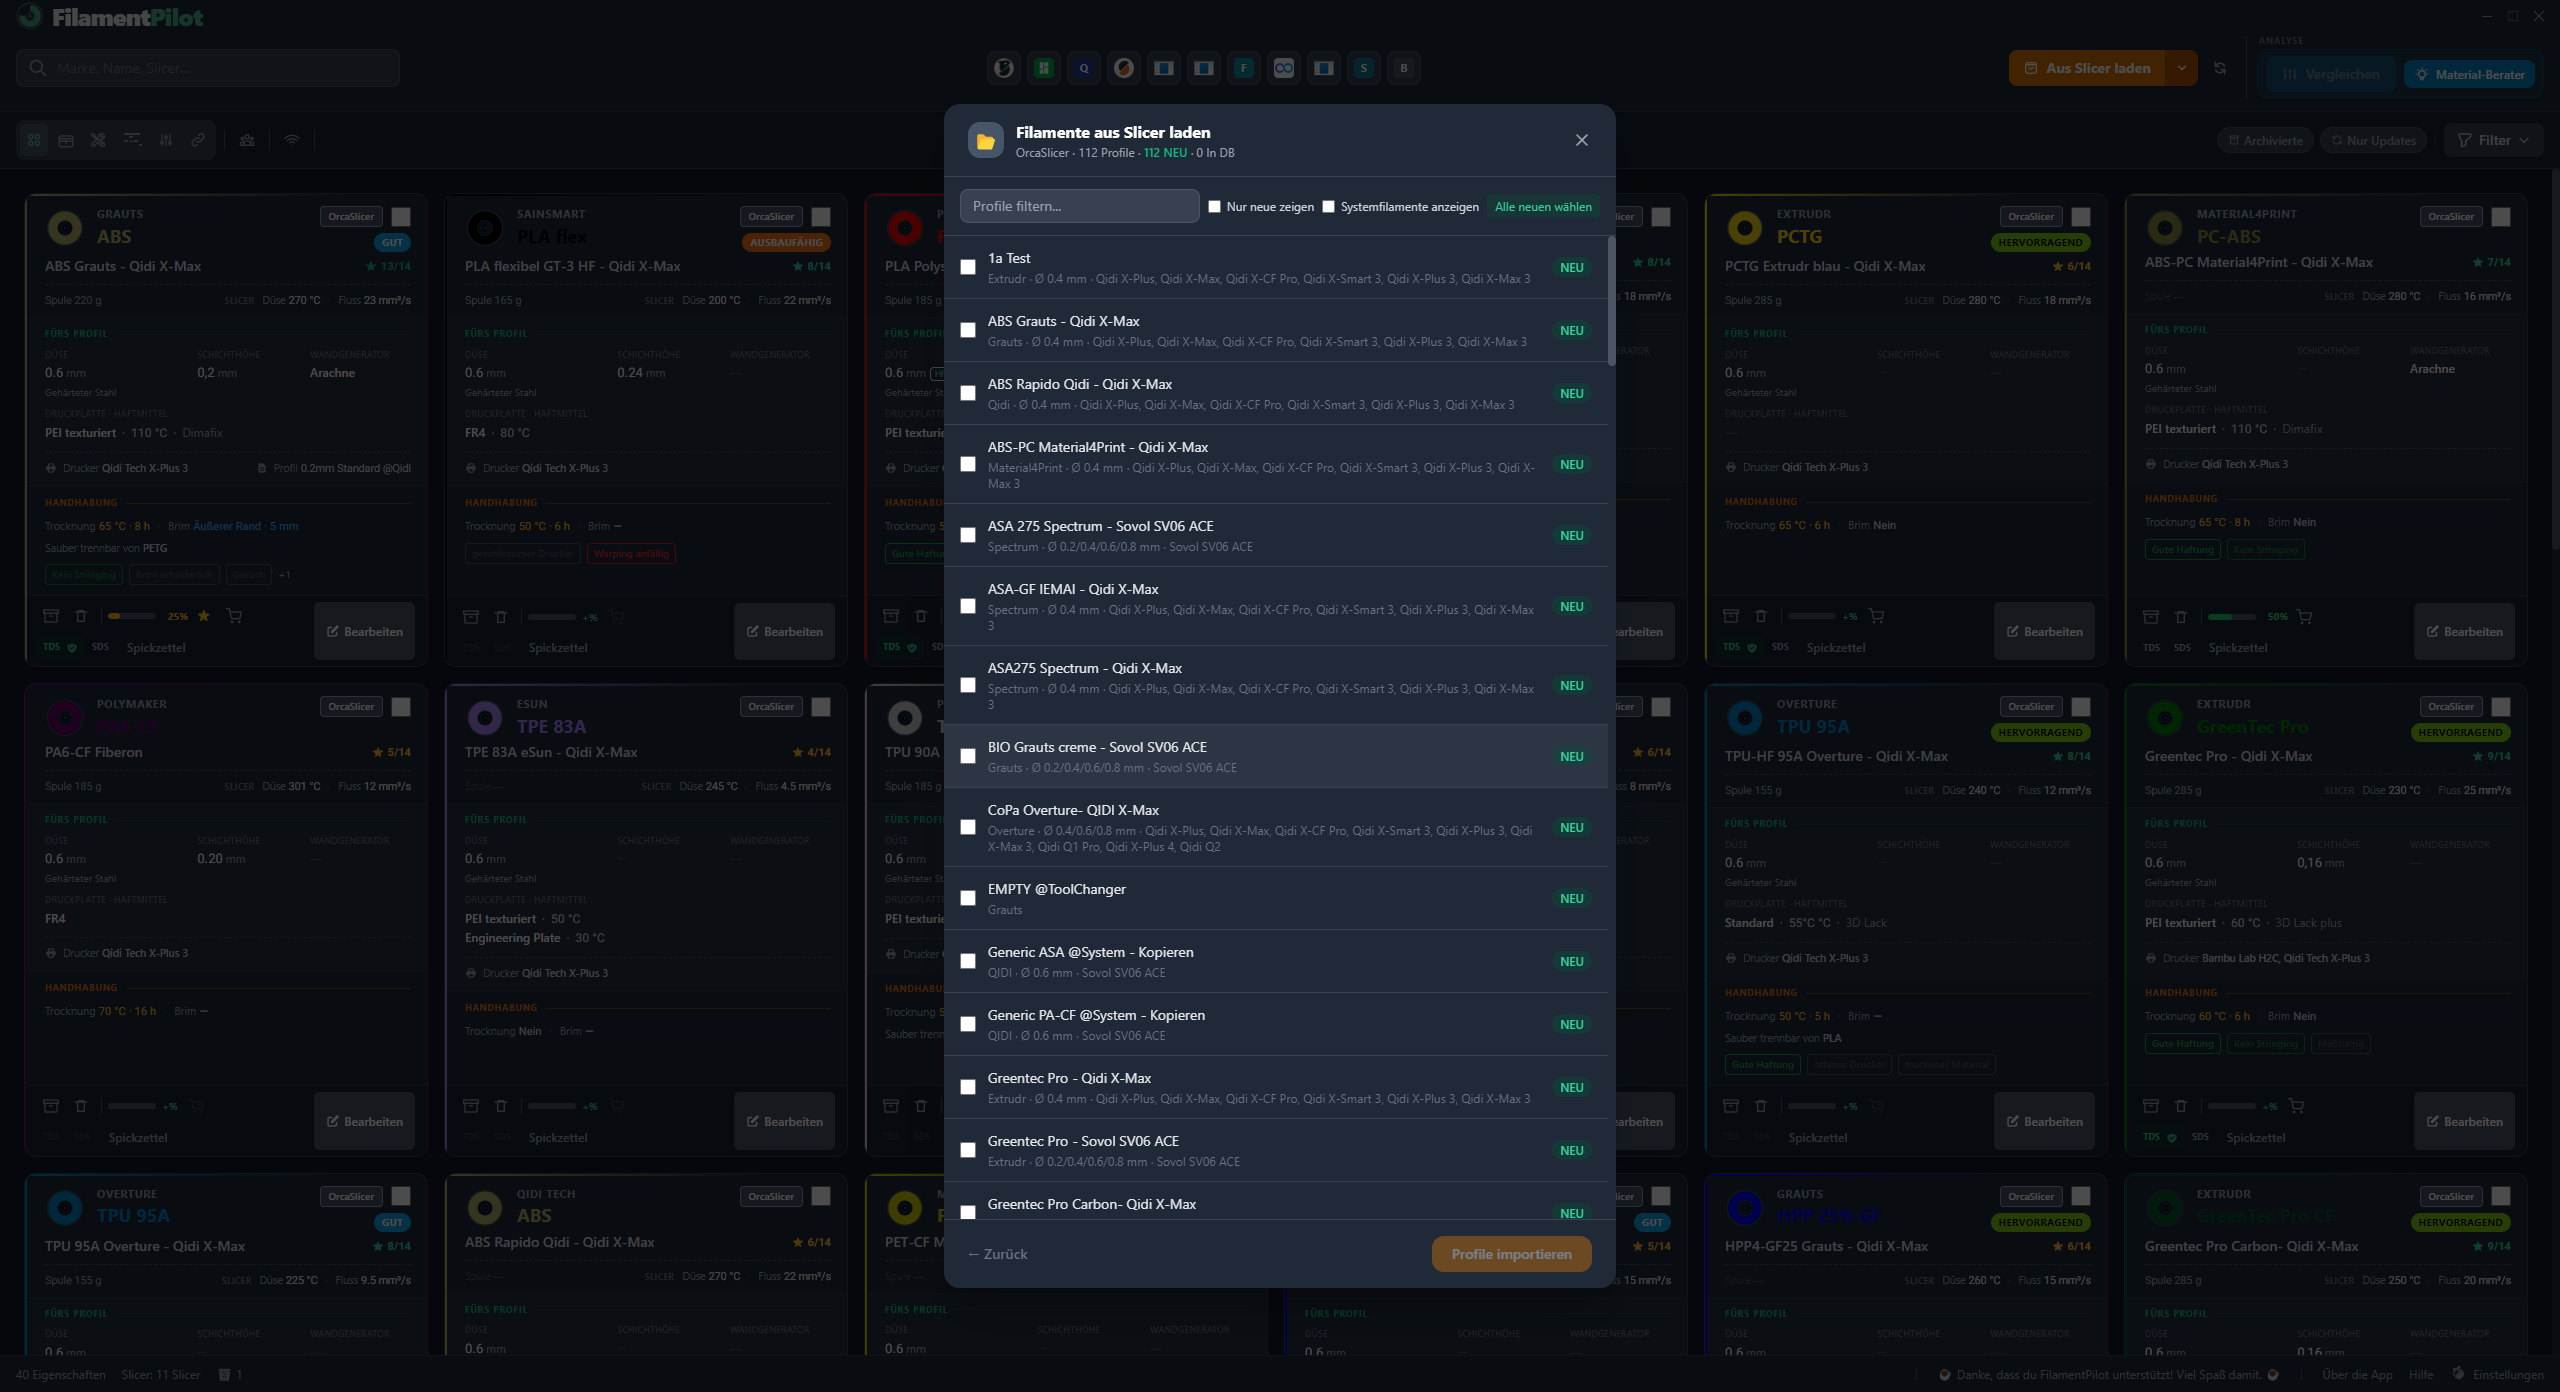
Step 3 of 7
Pick what you need
Now every filament profile it found is in front of you — fifty-six of them in this screenshot. You tick what you want to import. The app recognises what's already in your database and only flags what's new.
Optional: an extra checkbox also lists the manufacturer profiles (system filaments) that ship with your slicer. Whatever you import from there becomes your own copy among your filaments.
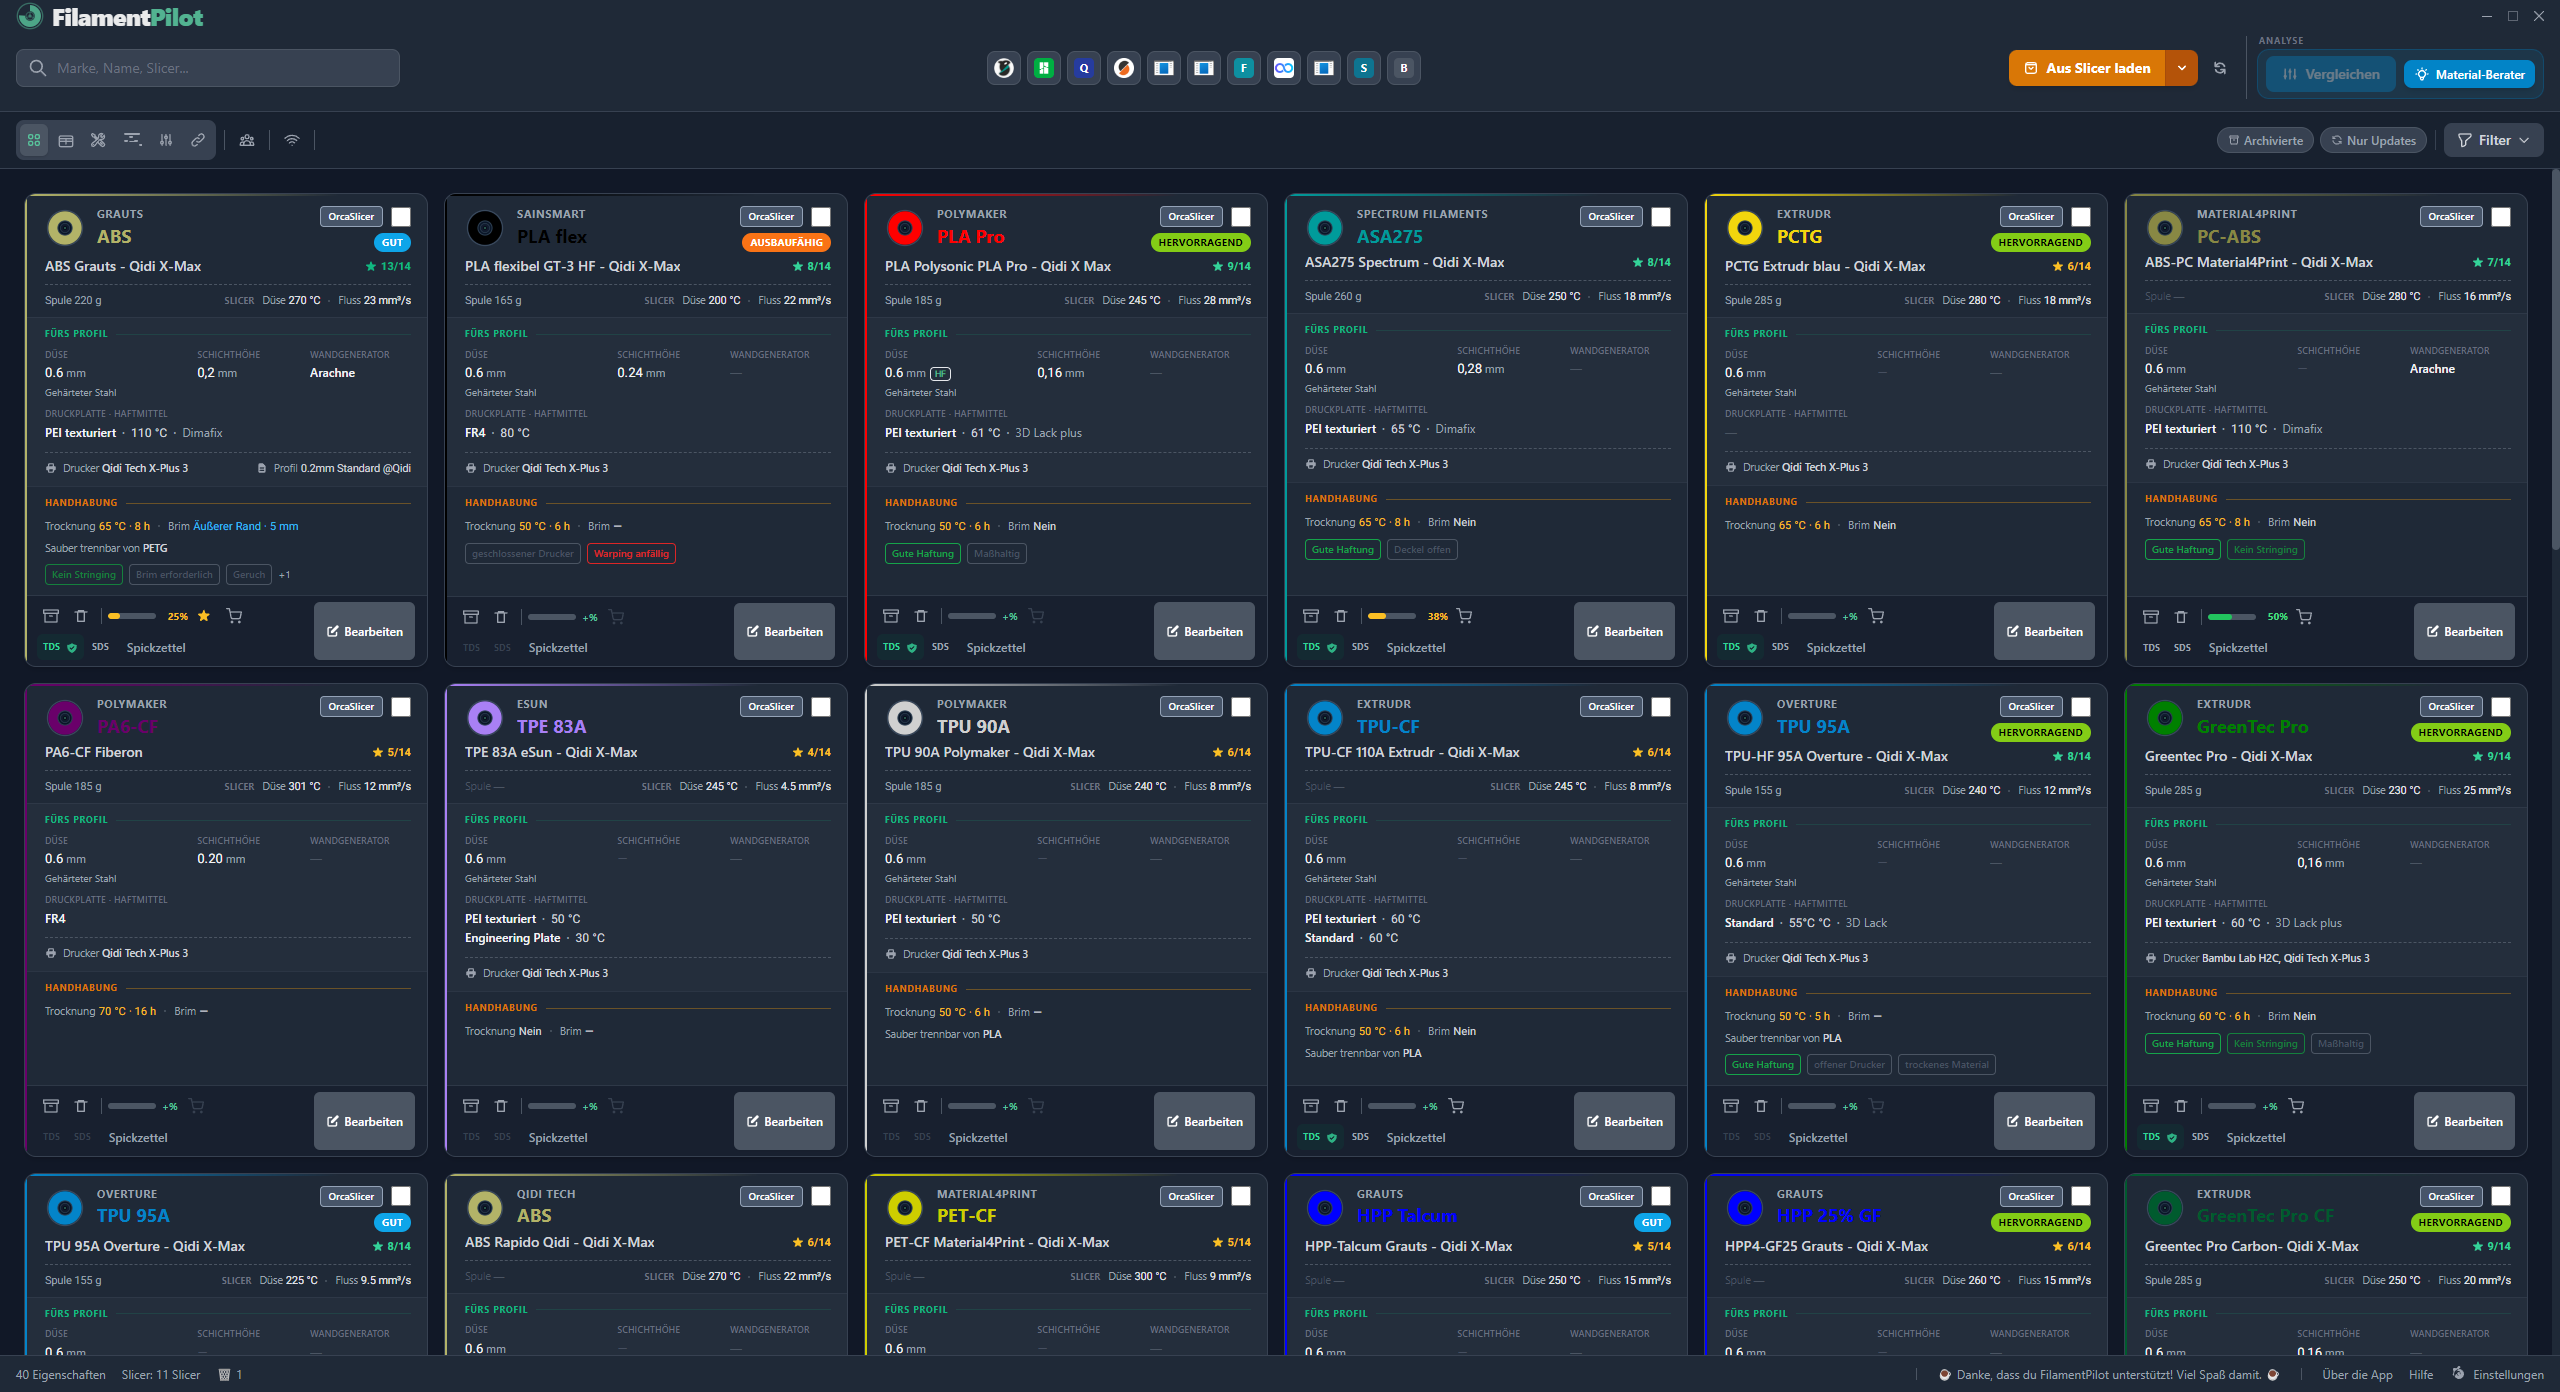
Step 4 of 7
The cards are there
Every profile becomes a card. Temperatures, flow, cooling, printer and nozzle are filled in right away — you haven't typed a single value.
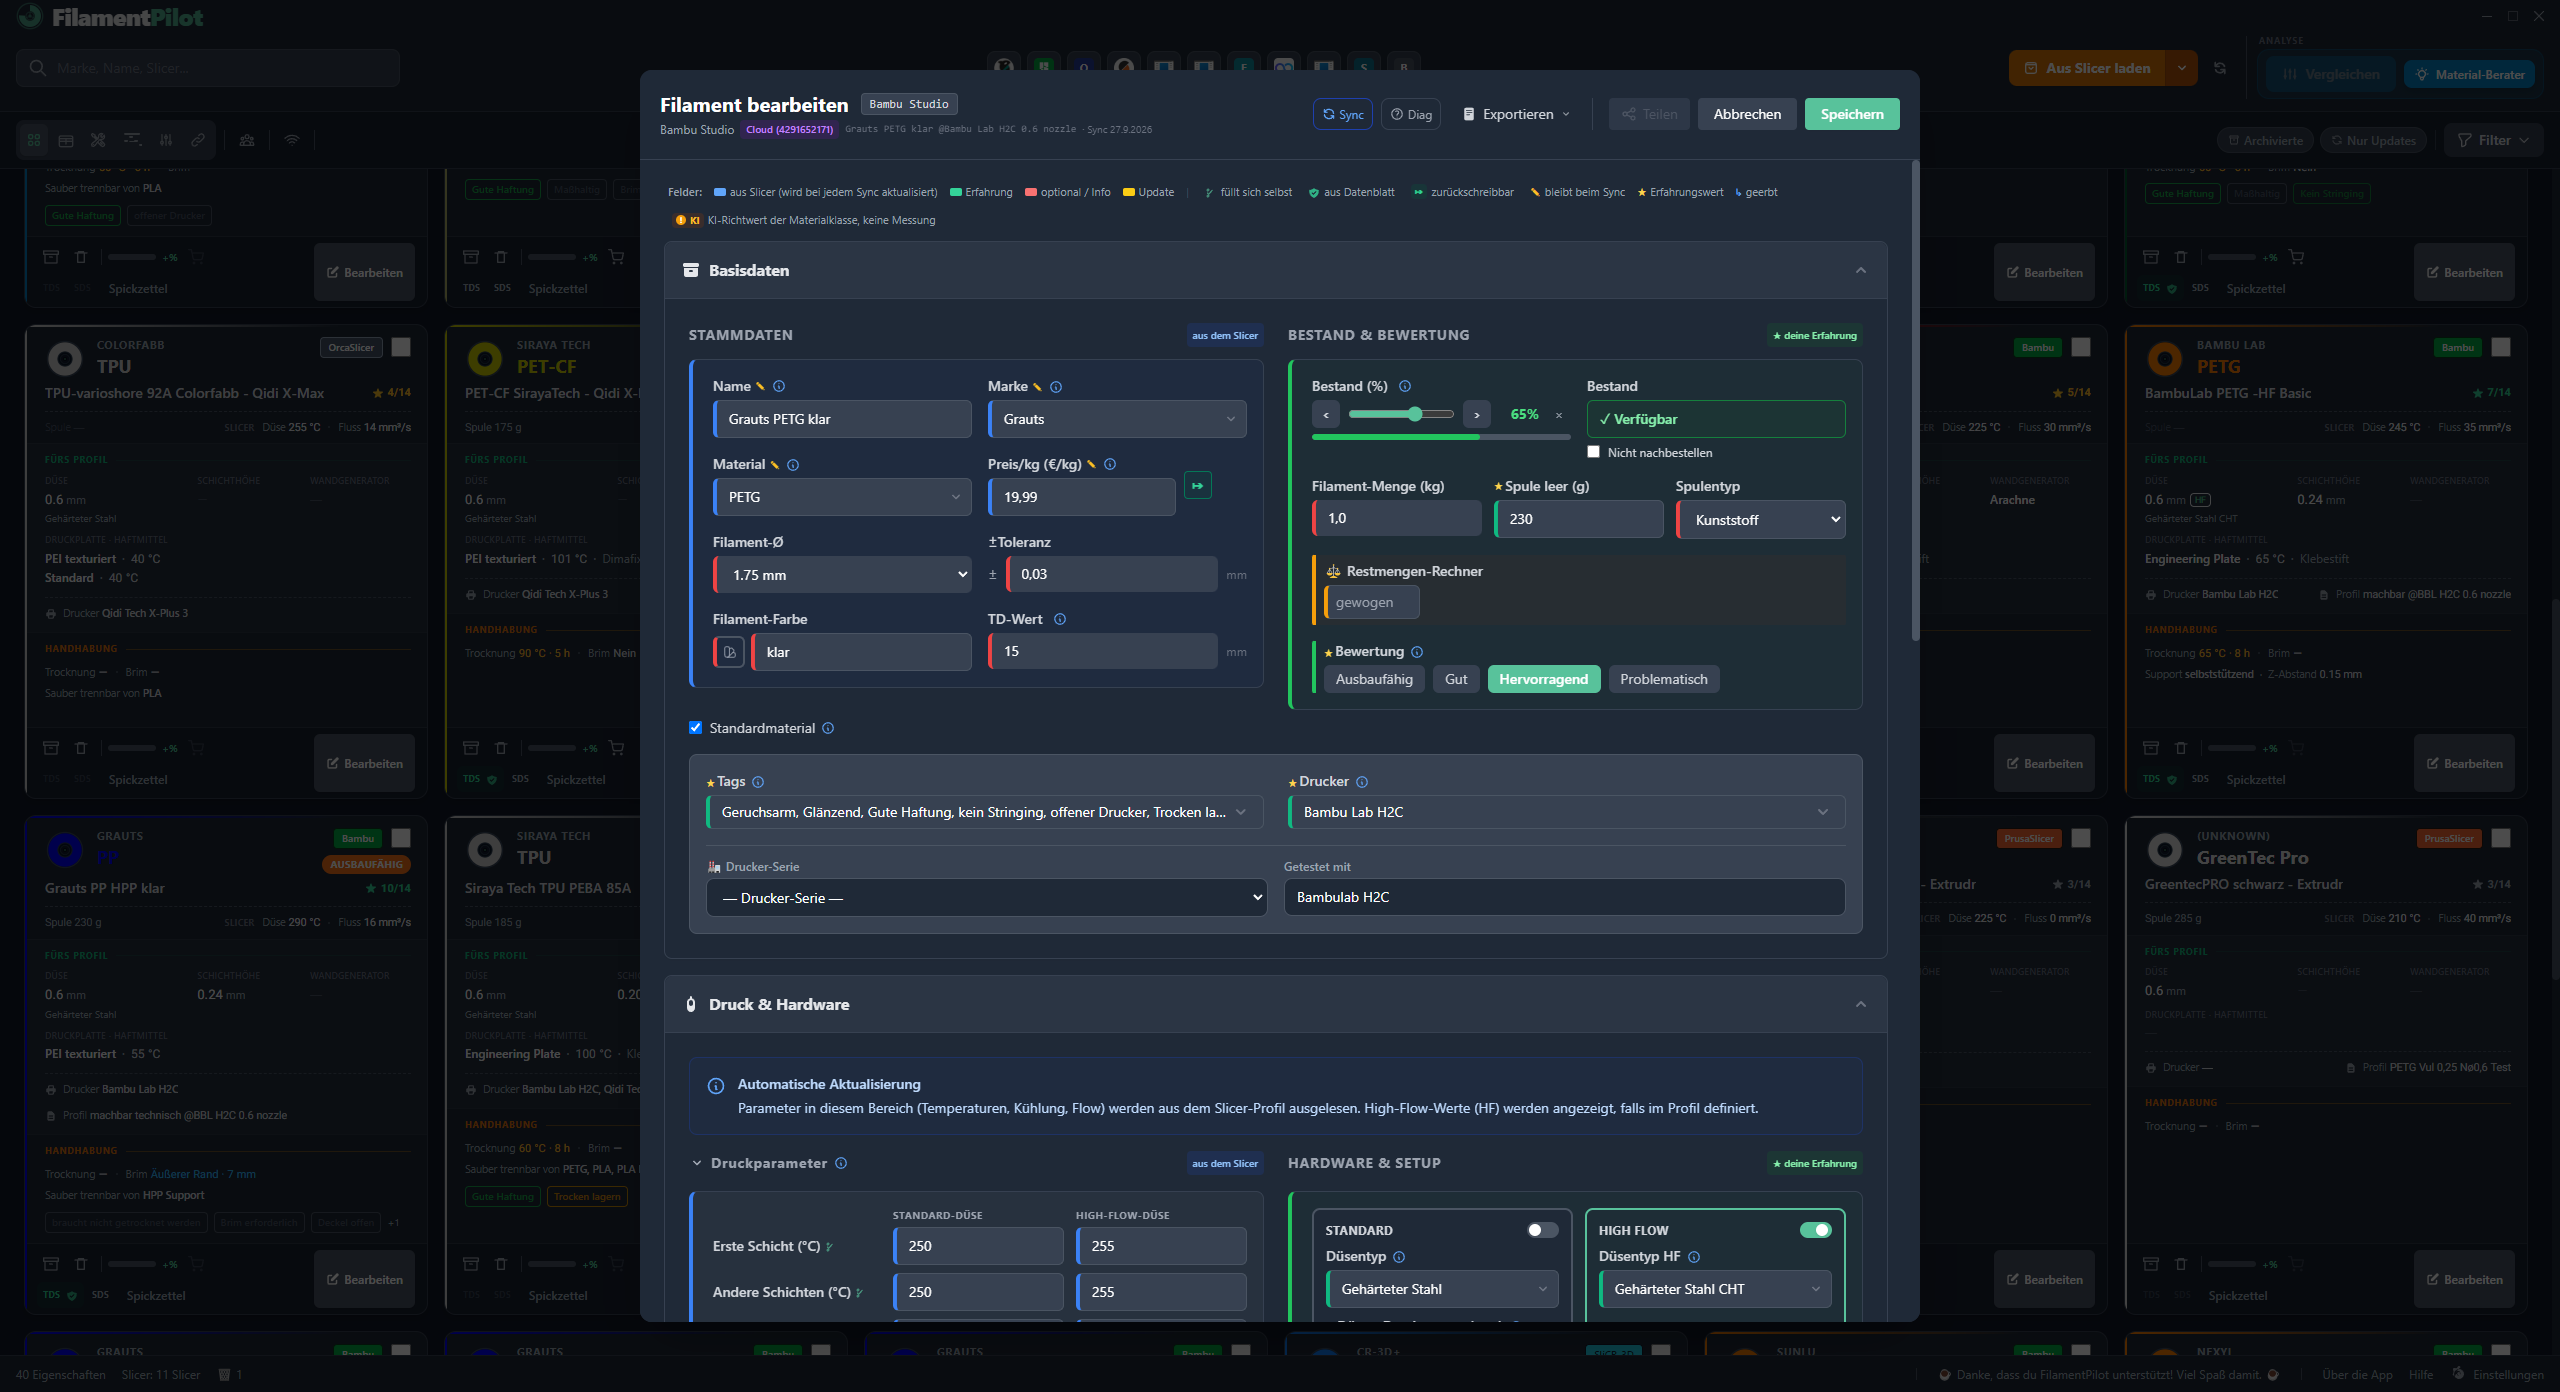
Step 5 of 7
Open a card
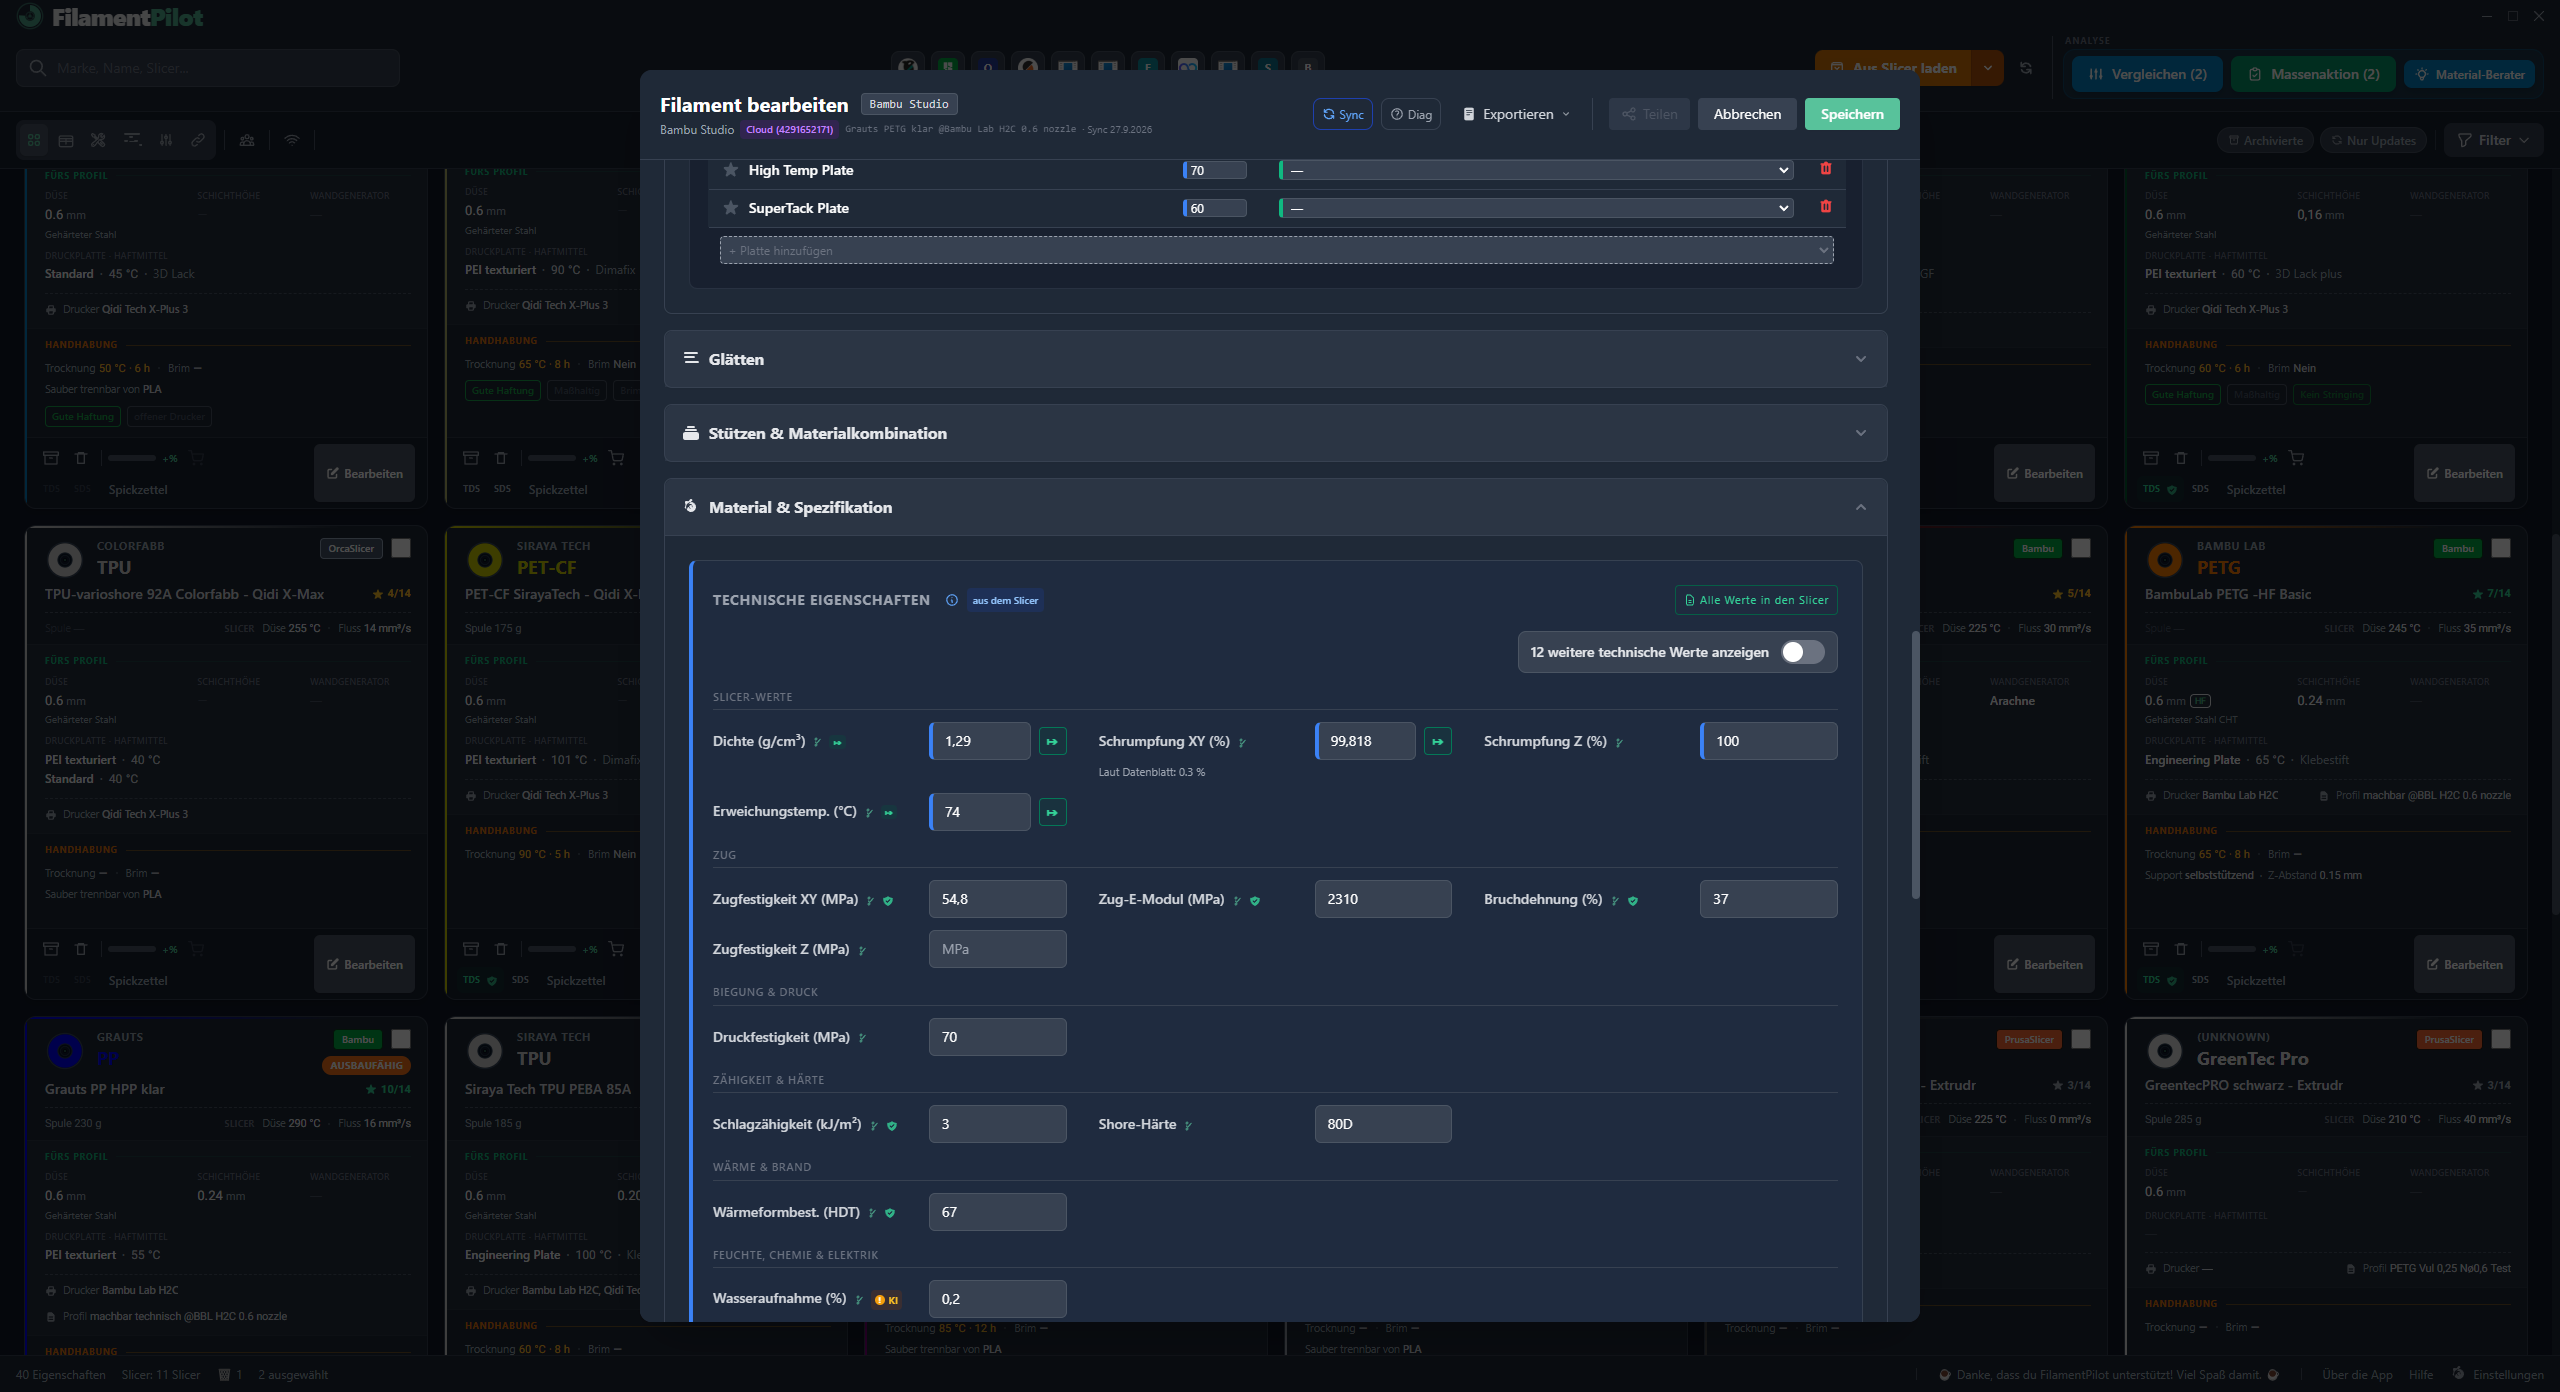
One click on "Edit" opens everything that belongs to this filament. What's marked blue came from the slicer. The rest is waiting for you.
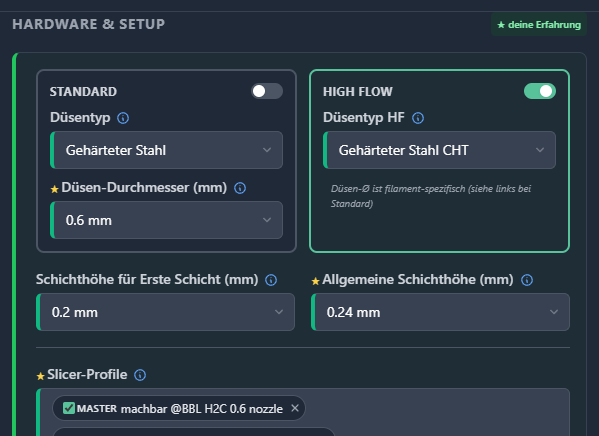
Step 6 of 7
Add your experience
Now comes the part no other program stores: nozzle and layer height, brim, drying, support material, post-processing. The ★ shows you which field counts toward the fourteen — and how far along you are.
Step 7 of 7
Write into every slicer
One click puts the filament where your slicer looks for its profiles — for the printer you chose. Even in a program that's never had this material before. Next time you open it, it's in the list.
And after that?
Every time you figure something out, you add it to the card. After a few weeks, your collection has become a reference book that doesn't exist anywhere else.
Chapter 2 · The overview
Everything FilamentPilot can do.
Four sources fill in a filament's card. Four paths lead back out. And the workshop sits around it all.
The overview
Set it up right once. After that, just look it up.
For every filament, you create one card — once, with everything that belongs to it. After that, you never maintain the same value in two places again. Everything you need — slicer profile, printout, comparison, your phone at the printer — comes from exactly that card.
Where it comes from
From your slicer
Whatever's already entered there, you pull across at the press of a button.
- Temperatures, flow rate, cooling
- Printer and nozzle are recognised
- Link print profiles permanently
- Changes to the profile stand out
From the datasheet
The PDF becomes values you can find again.
- Attach the datasheet and safety data sheet
- Pull in key figures via an AI prompt instead of typing
- Resistance to chemicals, UV, moisture
- Keep track of certificates
From the manufacturer
Adopt tested values instead of testing yourself.
- Load a ready-made profile file
- Tested values without searching
- The shop link comes right along with it
- Reference materials for comparison
From you
What only you know — and what's in no datasheet.
- Brim: the width and type that held
- Supports: distance, material, what comes off cleanly
- Drying and annealing, with time and temperature
- Layer height per nozzle, standard and high-flow kept separate
- Gluing, painting, acetone vapour smoothing
- Notes, rating, your own tags
- Earlier recipes stay retrievable
All in one place
The filament card
One card per filament. The numbers from the slicer and your own experience sit side by side in it — visibly separated, so you know what only you know. Once it's in there, it stays in there.
What you do with it
Write into every slicer
One filament, every program, every computer.
- Profile file for the printer you chose
- Even into programs that never had this filament
- Send individual values back
- Hand the profile to someone else
On paper
Your collection as a finished sheet at the printer.
- Cheat sheet as an A4 page
- Comparison datasheet for several filaments
- QR code for reordering
- Company footer with logo, if you want it
Let it decide
Which material this part can handle — answered from your own stock.
- Material advisor for your project
- Shows where every value comes from: data sheet, reference or estimate
- Radar comparison of several filaments
- Compare against steel, stainless steel, aluminium, wood and MDF
- And against technical plastics: POM, PTFE, PMMA, PE-UHMW
- See which materials work together
Take it to the printer
Look things up while the machine is running — without going back to the office.
- Phone access via the network folder
- Print the cheat sheet straight from your phone
- Shop link via QR code when reordering
- Every computer on the same state
Your own terms
None of it is fixed.
You maintain fifteen lists yourself — right down to the rating levels and the chemical classes. You work with your own terms, not ours.
Enter a new nozzle type or a new brand on one card, and it's available everywhere from then on. The app learns your vocabulary as you go.
And the workshop around it
🖨️ Printers
Model, warranty, dealer, support contact. FilamentPilot picks up your printers straight from the slicer.
In the app
Views › Printers & Spare Parts
🔧 Spare parts
Minimum stock, replacement date, warning before you run out
📐 Calibration
Layer height, wall flow, throughput, speed, shrinkage
In the app
Views › Calibration Tools
🔗 Links & files
Shop, datasheets, your own spreadsheets and videos
In the app
Views › Links & Attachments
🏭 Company mode
Logo, contact line and printer series on the cheat sheet
In the app
Settings › Company Mode
The dashboard
Even what you're missing shows up here.
Enter, for one filament, which material it prints alongside, releases from, or bonds with, and FilamentPilot remembers that partner material. If it keeps coming up without being in your own stock, it lands on the Material Wishlist — with key figures and a note of where you needed it.

Alongside that, the dashboard shows the completeness of every filament, what's fallen below your reorder threshold, and how many cards already carry a datasheet. All of it together comes out as a printable status report at the press of a button.
In the app
Views › Dashboard
Three of them, pictured
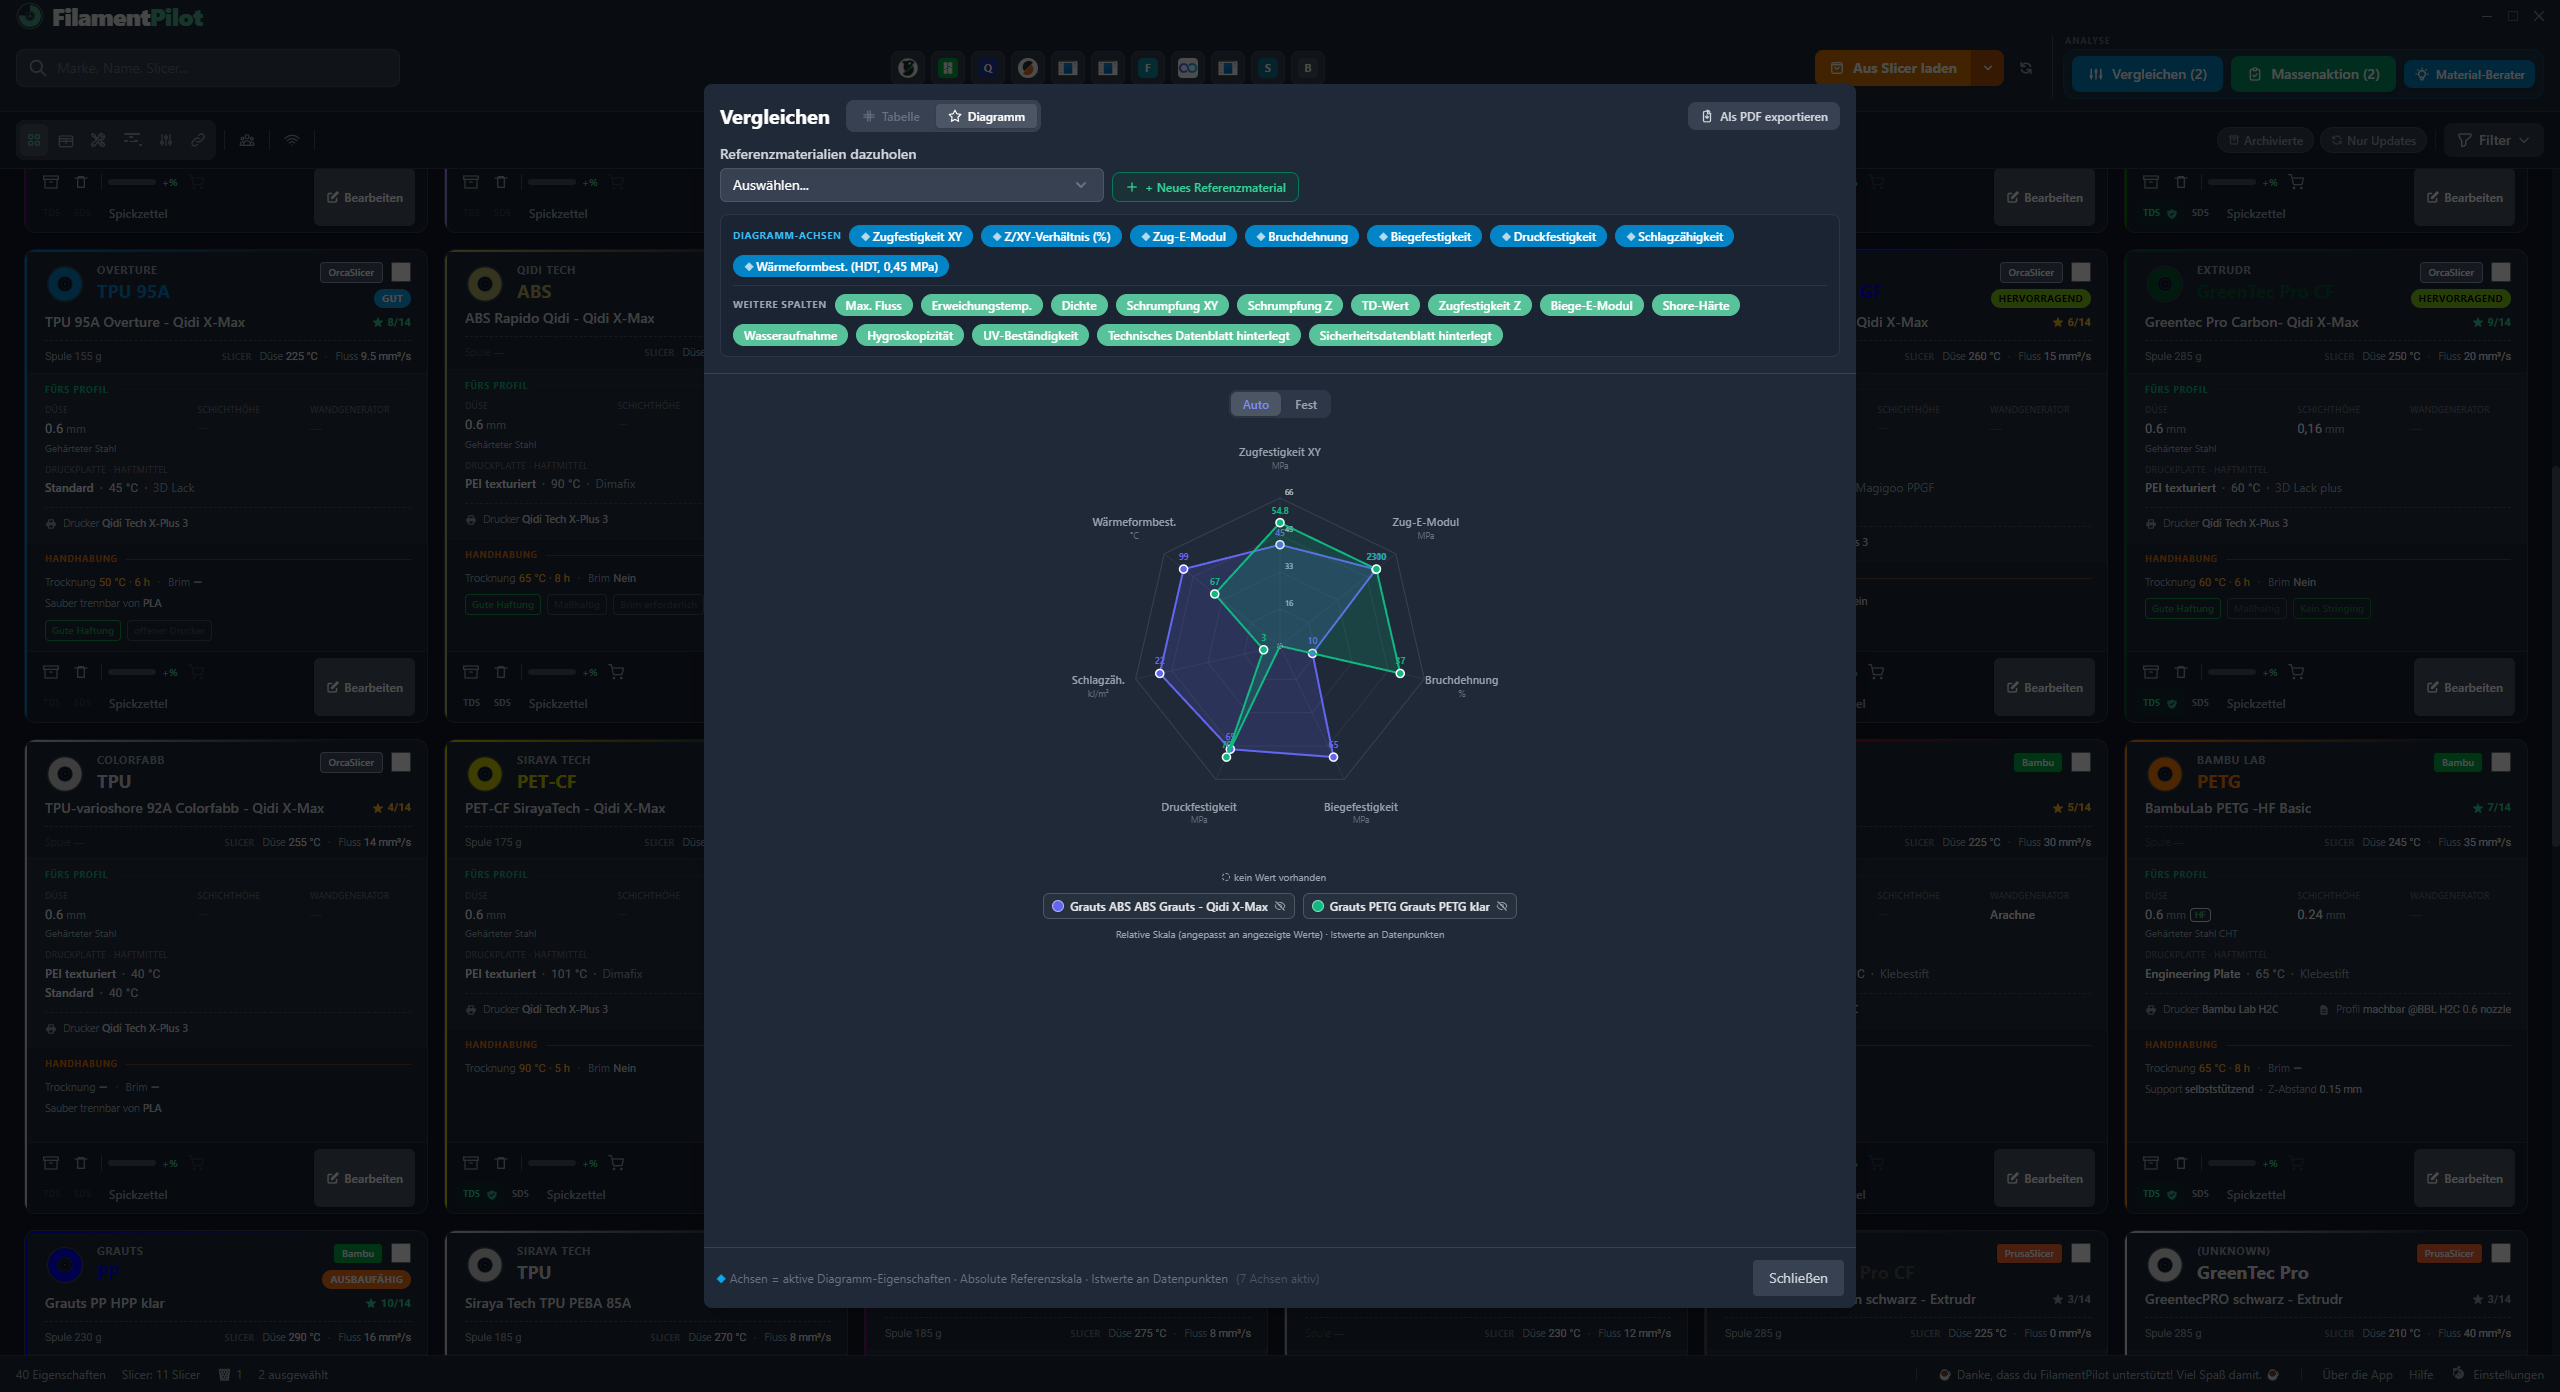
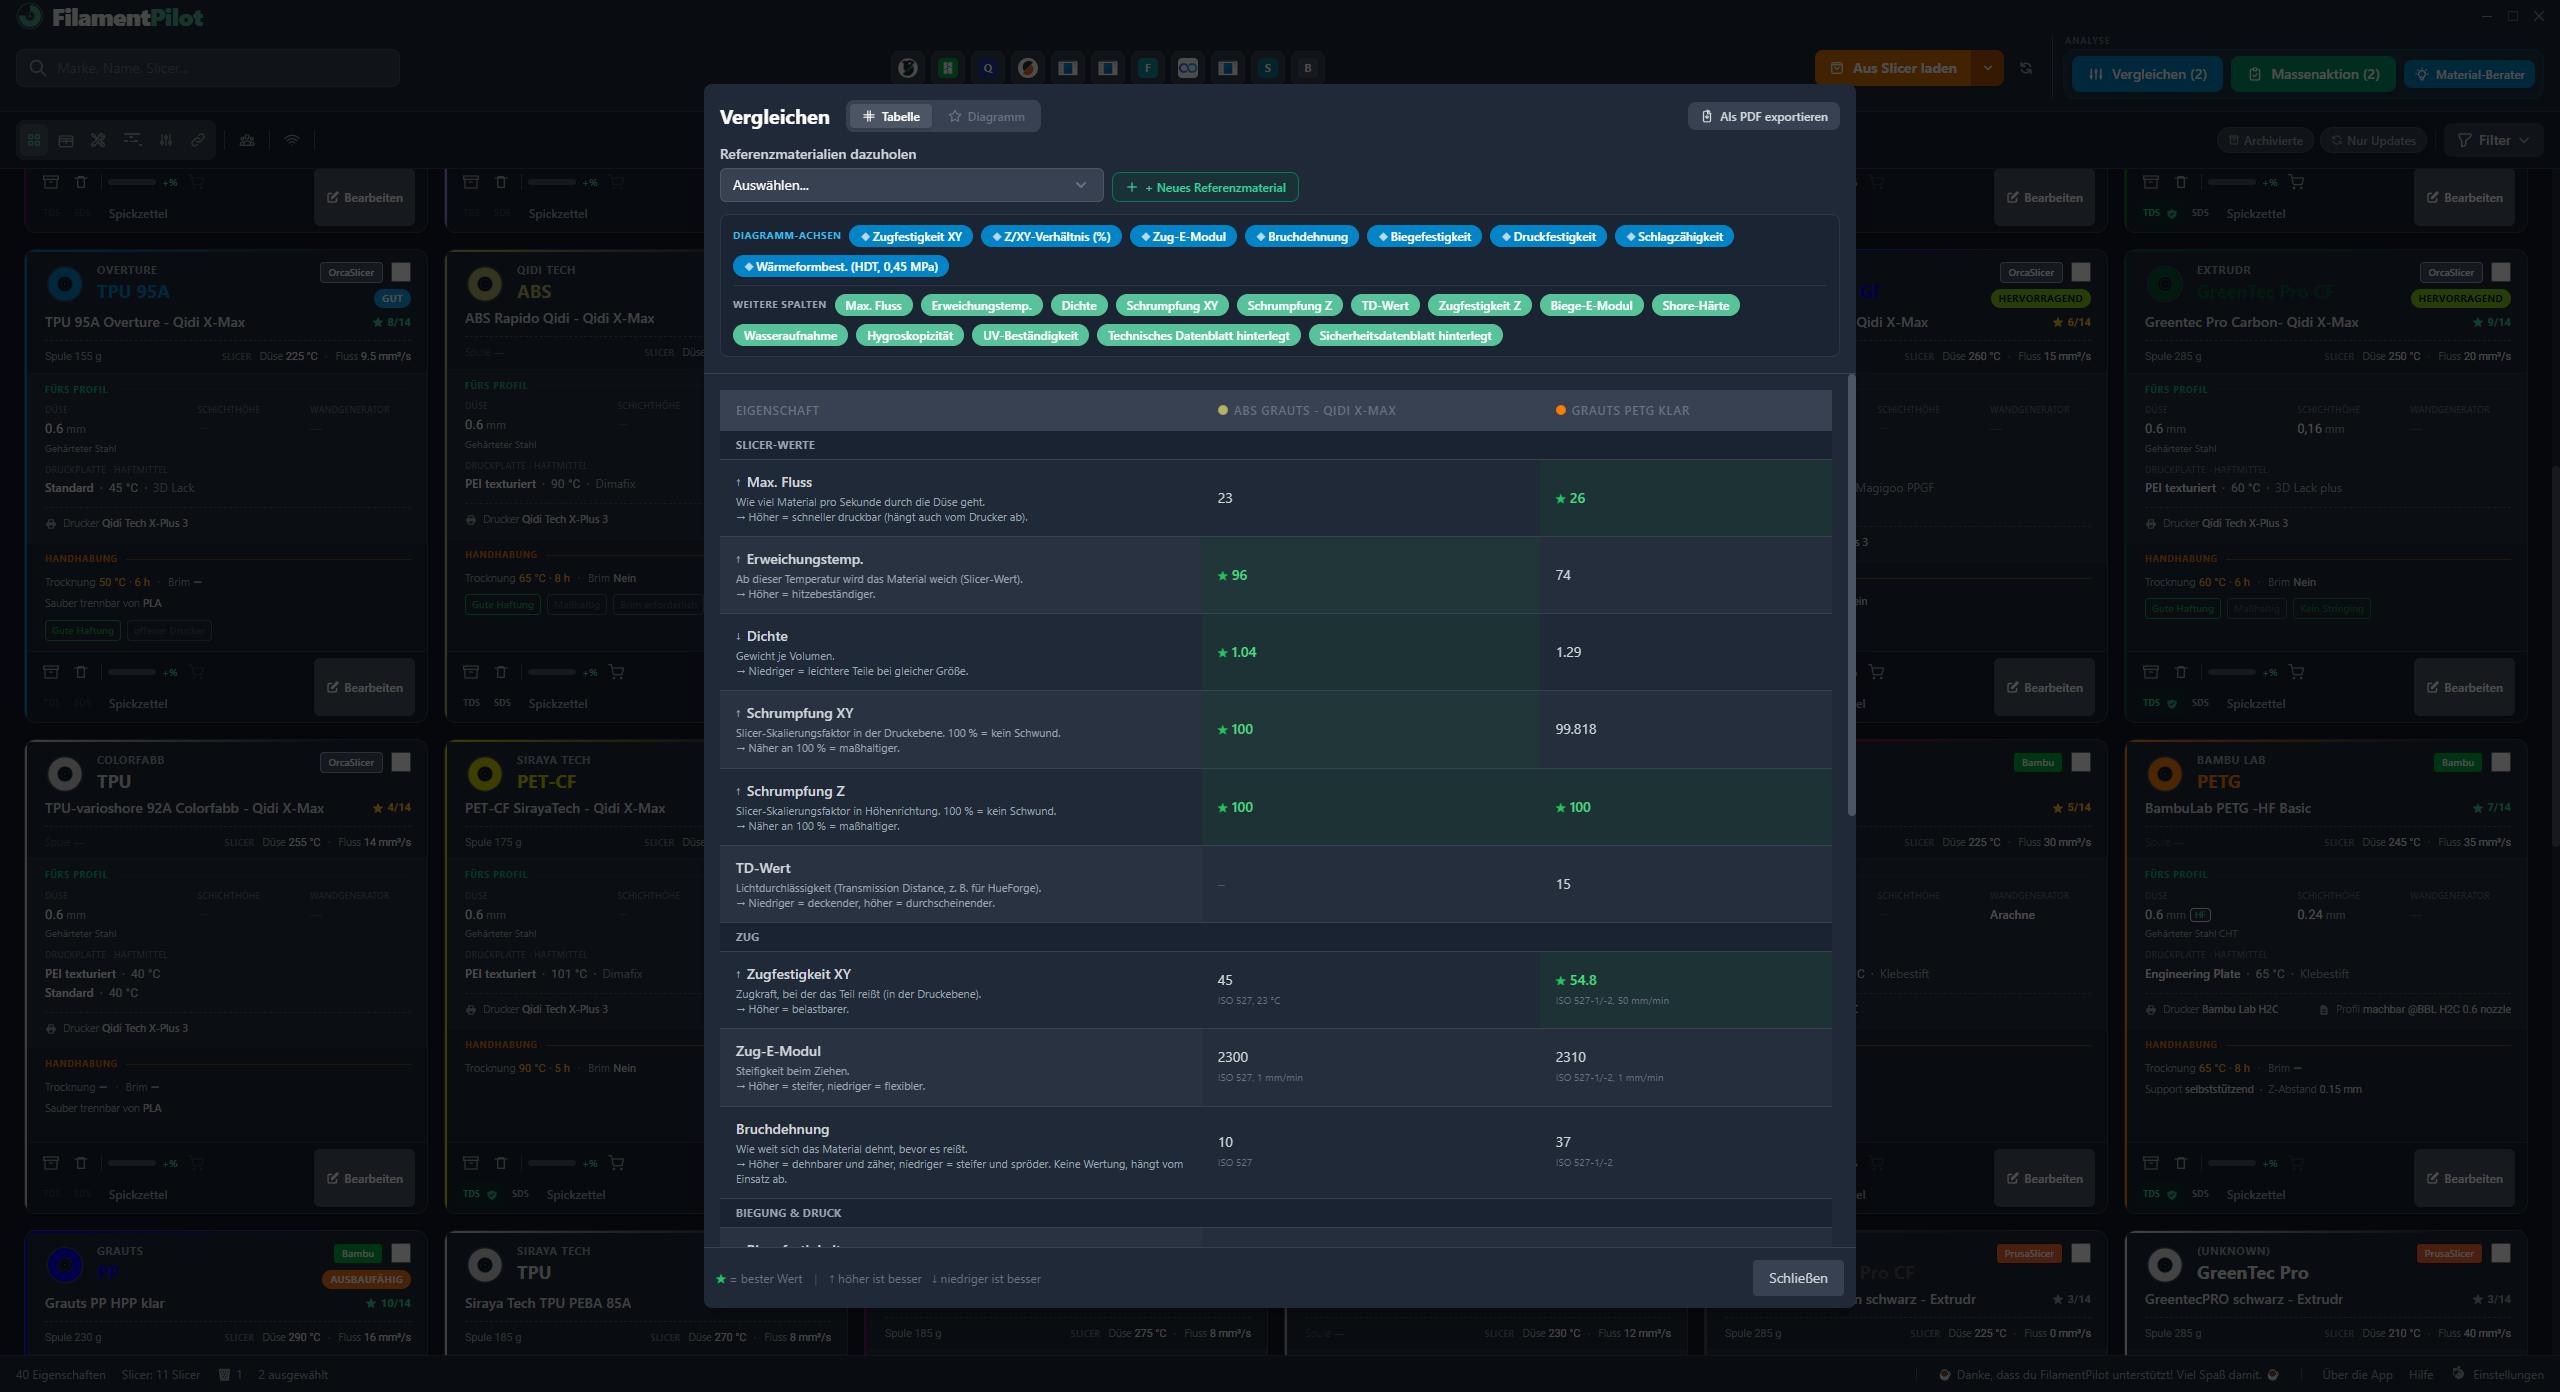
Comparison datasheet
Filaments side by side, values compared and the better one flagged — here ABS versus PETG. Every value shows its test standard, every property says whether higher or lower is better. The same layout is available as a chart and as a PDF.
In the app
Tick cards › Compare
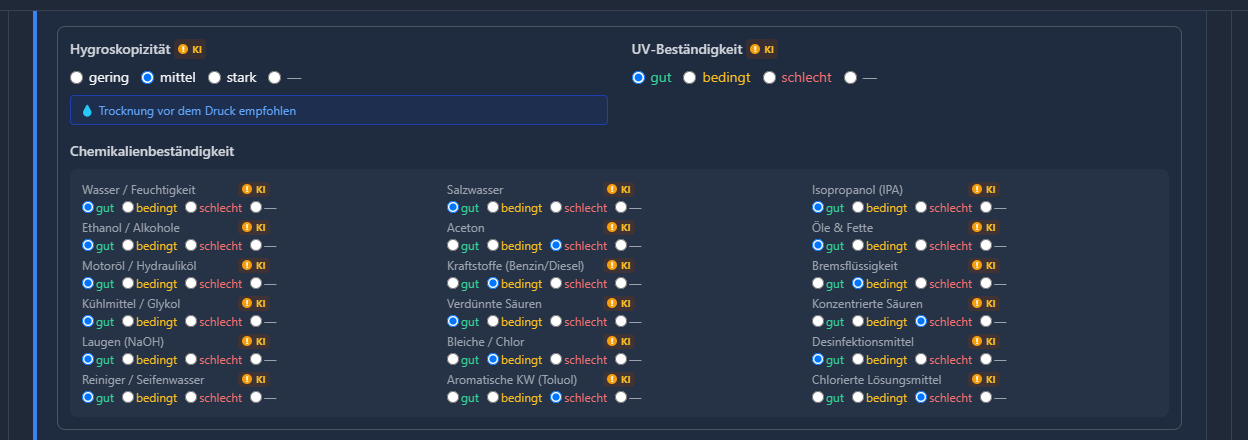
Resistance
Hygroscopicity, UV and eighteen chemical classes per material. Plus a note on whether it needs drying before printing.
In the app
Edit filament › Material & Specification
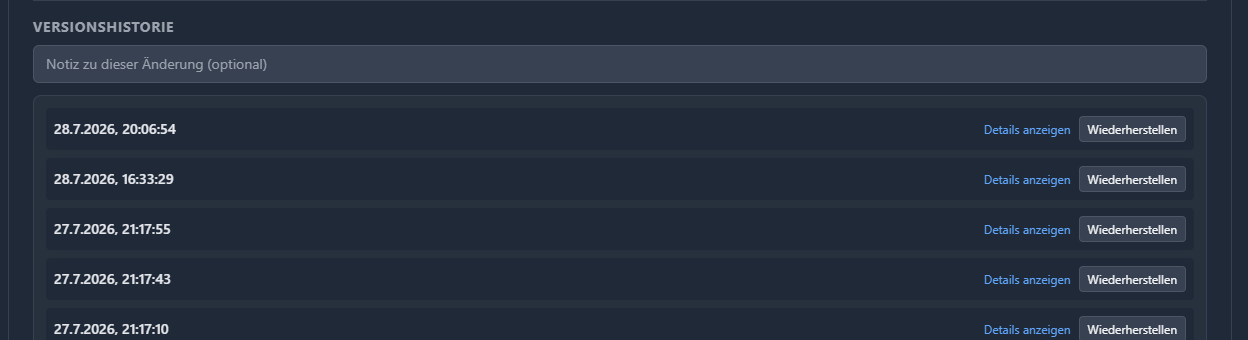
Version history
Every change to the print values is logged. An earlier state can be restored at any time.
In the app
Edit filament › Info & Files
Chapter 3 · One by one
The 14 experience values.
Every field carries a ★ in the app, and every card shows your progress as 14/14.
All fourteen values on this page are green. Red next to a field means: an extra detail not everyone needs — diameter, tolerance or stock. The pictures show the same colour-coding as the app.

01 of 14
Nozzle
Which diameter and which nozzle type worked. Standard and high-flow nozzles sit side by side but separate, because the two behave differently.

02 of 14
Layer height
The height that actually printed cleanly with this nozzle and this material. The value belongs in the print profile — here it's there to look up before you print.

03 of 14
Wall generator
Classic or Arachne. If the card diverges from the linked master profile, FilamentPilot shows the other value right underneath.
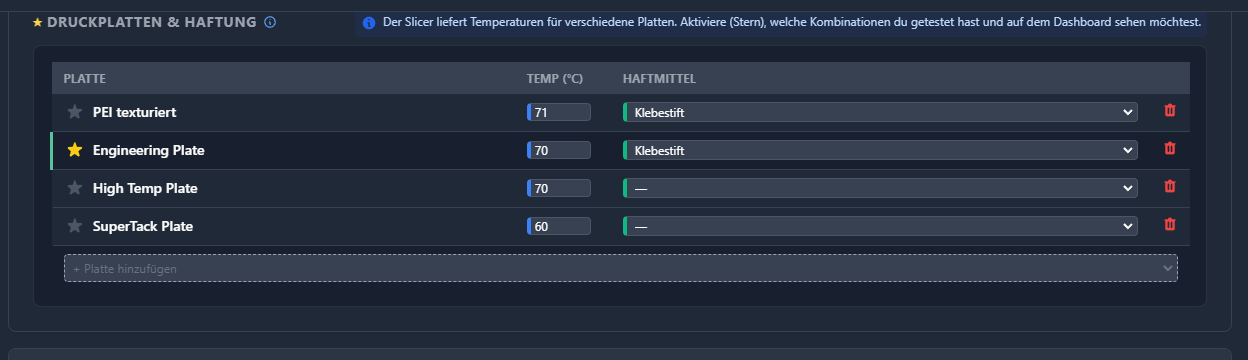
04 of 14
Build plate and adhesive
For every plate, the temperature and the adhesive that held. You mark your preferred plate with the star — it shows up on the card and on the printout.

05 of 14
Brim
Needed or not — and if so, which type and which width. Exactly the detail you no longer remember after three months.
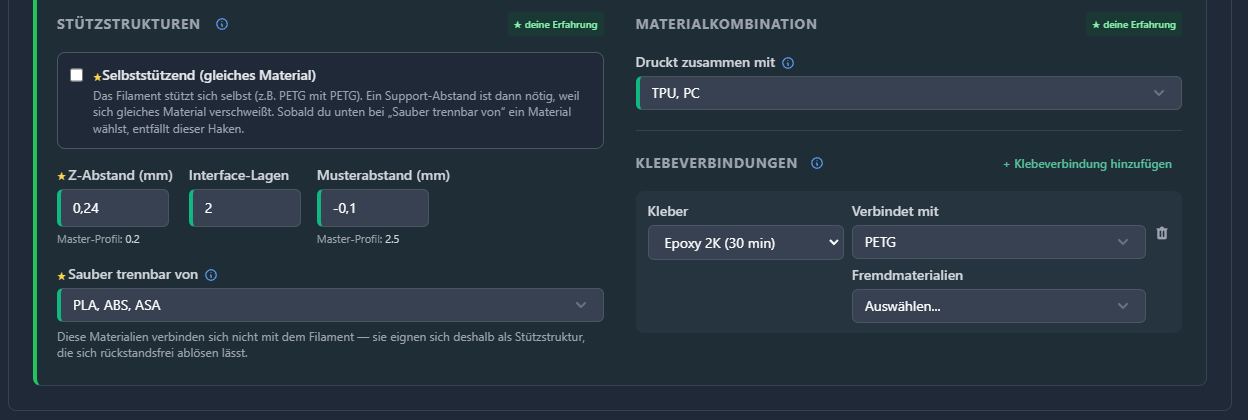
06 of 14
Supports
Z-distance, interface layers and pattern spacing. Plus material compatibility: which support material releases cleanly, what can be printed together, and which glue holds the bond.

07 of 14
Drying
Temperature and hours — or explicitly: not needed. A deliberate "no" counts too, since it ends the searching just the same.

08 of 14
Annealing
Whether the finished part gets post-treated, at what temperature and for how long. The oven is switched off afterwards and the part cools down inside it — otherwise it warps.
09 of 14
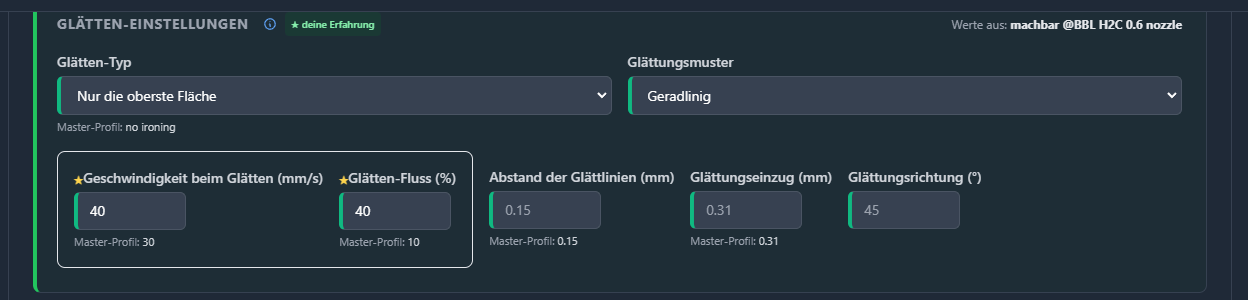
Ironing
Speed, flow, pattern spacing and angle for ironing the surface. Values you determine once and never search for again.

10 of 14
Print profile
Which slicer profile belongs to this filament. You mark one as the master — then FilamentPilot flags it when something changed in the slicer while the card still shows the old state.

11 of 14
Printer
Which machine you tested the material on. With several printers, you see at a glance what a value applies to.

12 of 14
Spool weight
The weight of the empty spool. FilamentPilot uses it to calculate the remaining amount when you weigh the roll: enter the reading, the empty spool is subtracted, one click takes the result as your stock.

13 of 14
Rating
How well the material worked for you. Four levels, set in one click — and sortable in the overview.

14 of 14
Tags
Your own system: by project, by customer, by property. You maintain the tag list yourself.
Chapter 4 · From the datasheet
The manufacturer's values, without typing them in.
The technical data sheet holds the numbers your card needs. Tensile strength flat and upright, impact strength, elongation at break, modulus, HDT, density and the rest. For every value, FilamentPilot also keeps the test standard it was measured to.
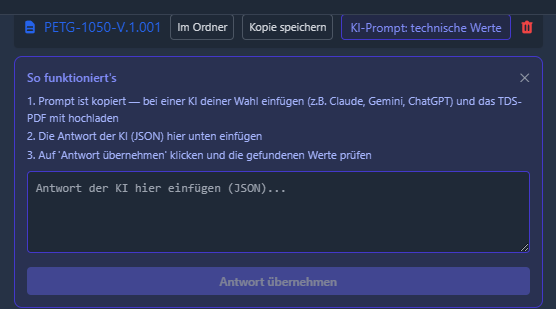
- 1
Copy the prompt. One click puts the ready-made question on your clipboard — tailored to this material.
- 2
Paste it into your AI. Claude, Gemini, ChatGPT — whichever you already use. Drag the data sheet straight from FilamentPilot into the chat.
- 3
Paste the answer back. The values it found then show up highlighted in yellow on the card — so you check them before saving.
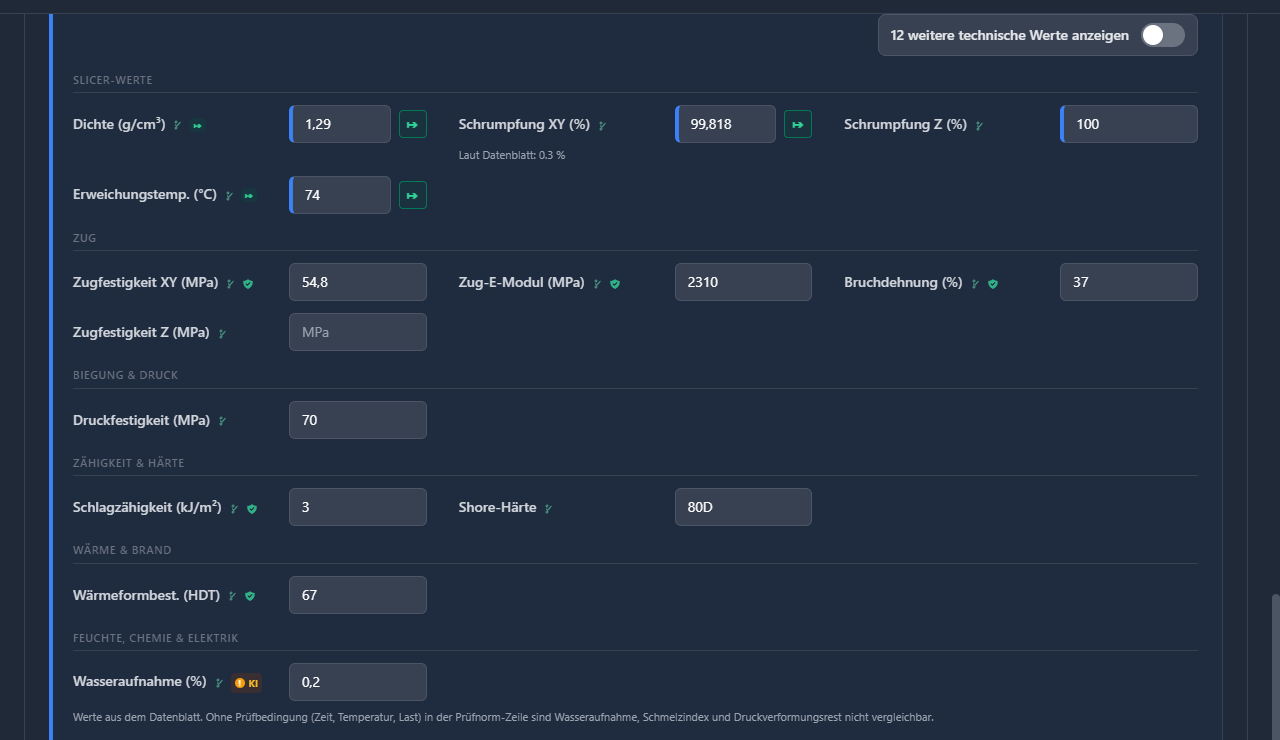
Only values that actually compare.
Two manufacturers, both say “tensile strength 50 MPa”, and it still isn't the same: one printed the specimen flat, the other injection-moulded it. One tested to ISO, the other to ASTM.
FilamentPilot splits tensile strength into XY and Z and records the test standard for every value. The comparison shows a ≠ whenever two values weren't measured the same way.
By default you only see the core values. One switch shows all the others, from flexural strength to the UL 94 fire rating.
In the app
Edit filament › Material & specification
No PDF handy?
If you've saved the link to the datasheet, it's already in the prompt. You don't even need to download the file first.
Even without a datasheet
A second button pulls in reference values for the material class: hygroscopicity, UV resistance and eighteen chemical classes.
There's no AI built into FilamentPilot.
The app puts the question together — you get it answered wherever you like. No account, no per-query fees, no data sent to us.
What comes back is either data from a datasheet or reference values for the material class — not a measurement of your actual spool. That's why FilamentPilot flags every imported value until you've reviewed it.
Chapter 5 · Our recommendation
How to set up your profiles.
One print profile per printer, one filament profile per material — and why that's less work over the years.
The rule
One print profile per printer. One filament profile per material.
The two profile types describe two different things. Once you keep them cleanly separated, your collection stays manageable — even after your third printer.
The print profile describes the machine
It's tied to your hardware and only changes when you change something about the hardware.
- • Layer height and line width
- • Speeds and acceleration
- • Wall generator, seam position, support structure
- • One per printer — one more per nozzle size
The filament profile describes the material
It's tied to the spool and travels with it through every one of your printers.
- • Nozzle and bed temperature
- • Throughput limit and cooling
- • Retraction, density, shrinkage, price
- • This is exactly where FilamentPilot writes
The most common detour
Why you shouldn't create a print profile for every filament.
The approach feels convenient: one print profile "PETG blue", one "ASA black", one "PLA silk". After a few months, you're maintaining a collection that costs you more time than it saves.
What it turns into
Ten materials become ten print profiles. Add the 0.6 mm nozzle and that's twenty; add the high-flow nozzle and it's forty.
At the next slicer update, you change one setting on the machine — and have to re-enter it forty times.
Eventually you no longer know, for one profile, whether a difference was intentional or a forgotten experiment.
Separate by cause instead: Whatever comes from the machine stays in the print profile. Whatever comes from the material goes into the filament profile.
For experienced users
Already dialled in your profile? Then keep it.
FilamentPilot only ever writes into the filament profile — your print profile stays exactly as you've set it. Use the app as a reference: which layer height worked for that ASA? What throughput does the 0.6 mm nozzle handle? You look up the value and enter it yourself.
A real-world example
The print profile for the 0.6 mm nozzle has a 0.24 mm layer height. For ASA, 0.2 mm printed noticeably cleaner, especially on overhangs. That finding lives in FilamentPilot on the ASA card — and when you print ASA, you enter it into your print profile. Nothing transfers automatically. But you never have to figure it out again either.
Getting specific
It writes: a complete filament profile
Into the folder where your slicer looks for its profiles — for the printer you chose. Next time you open the slicer, it's in the list. Even in a program where you've never had this filament before.
It writes back: four individual values
If you've corrected something in FilamentPilot, it goes back into the slicer file at the press of a button. These fields carry the ↦ symbol for that:
Important: the slicer should be fully closed. If it's still running, it will overwrite the change the next time it saves.
It leaves to you: your print profile
Layer height, speed, wall generator — the app doesn't touch any of that. Values you need there are ready to look up. You enter them yourself.
When you want more precision
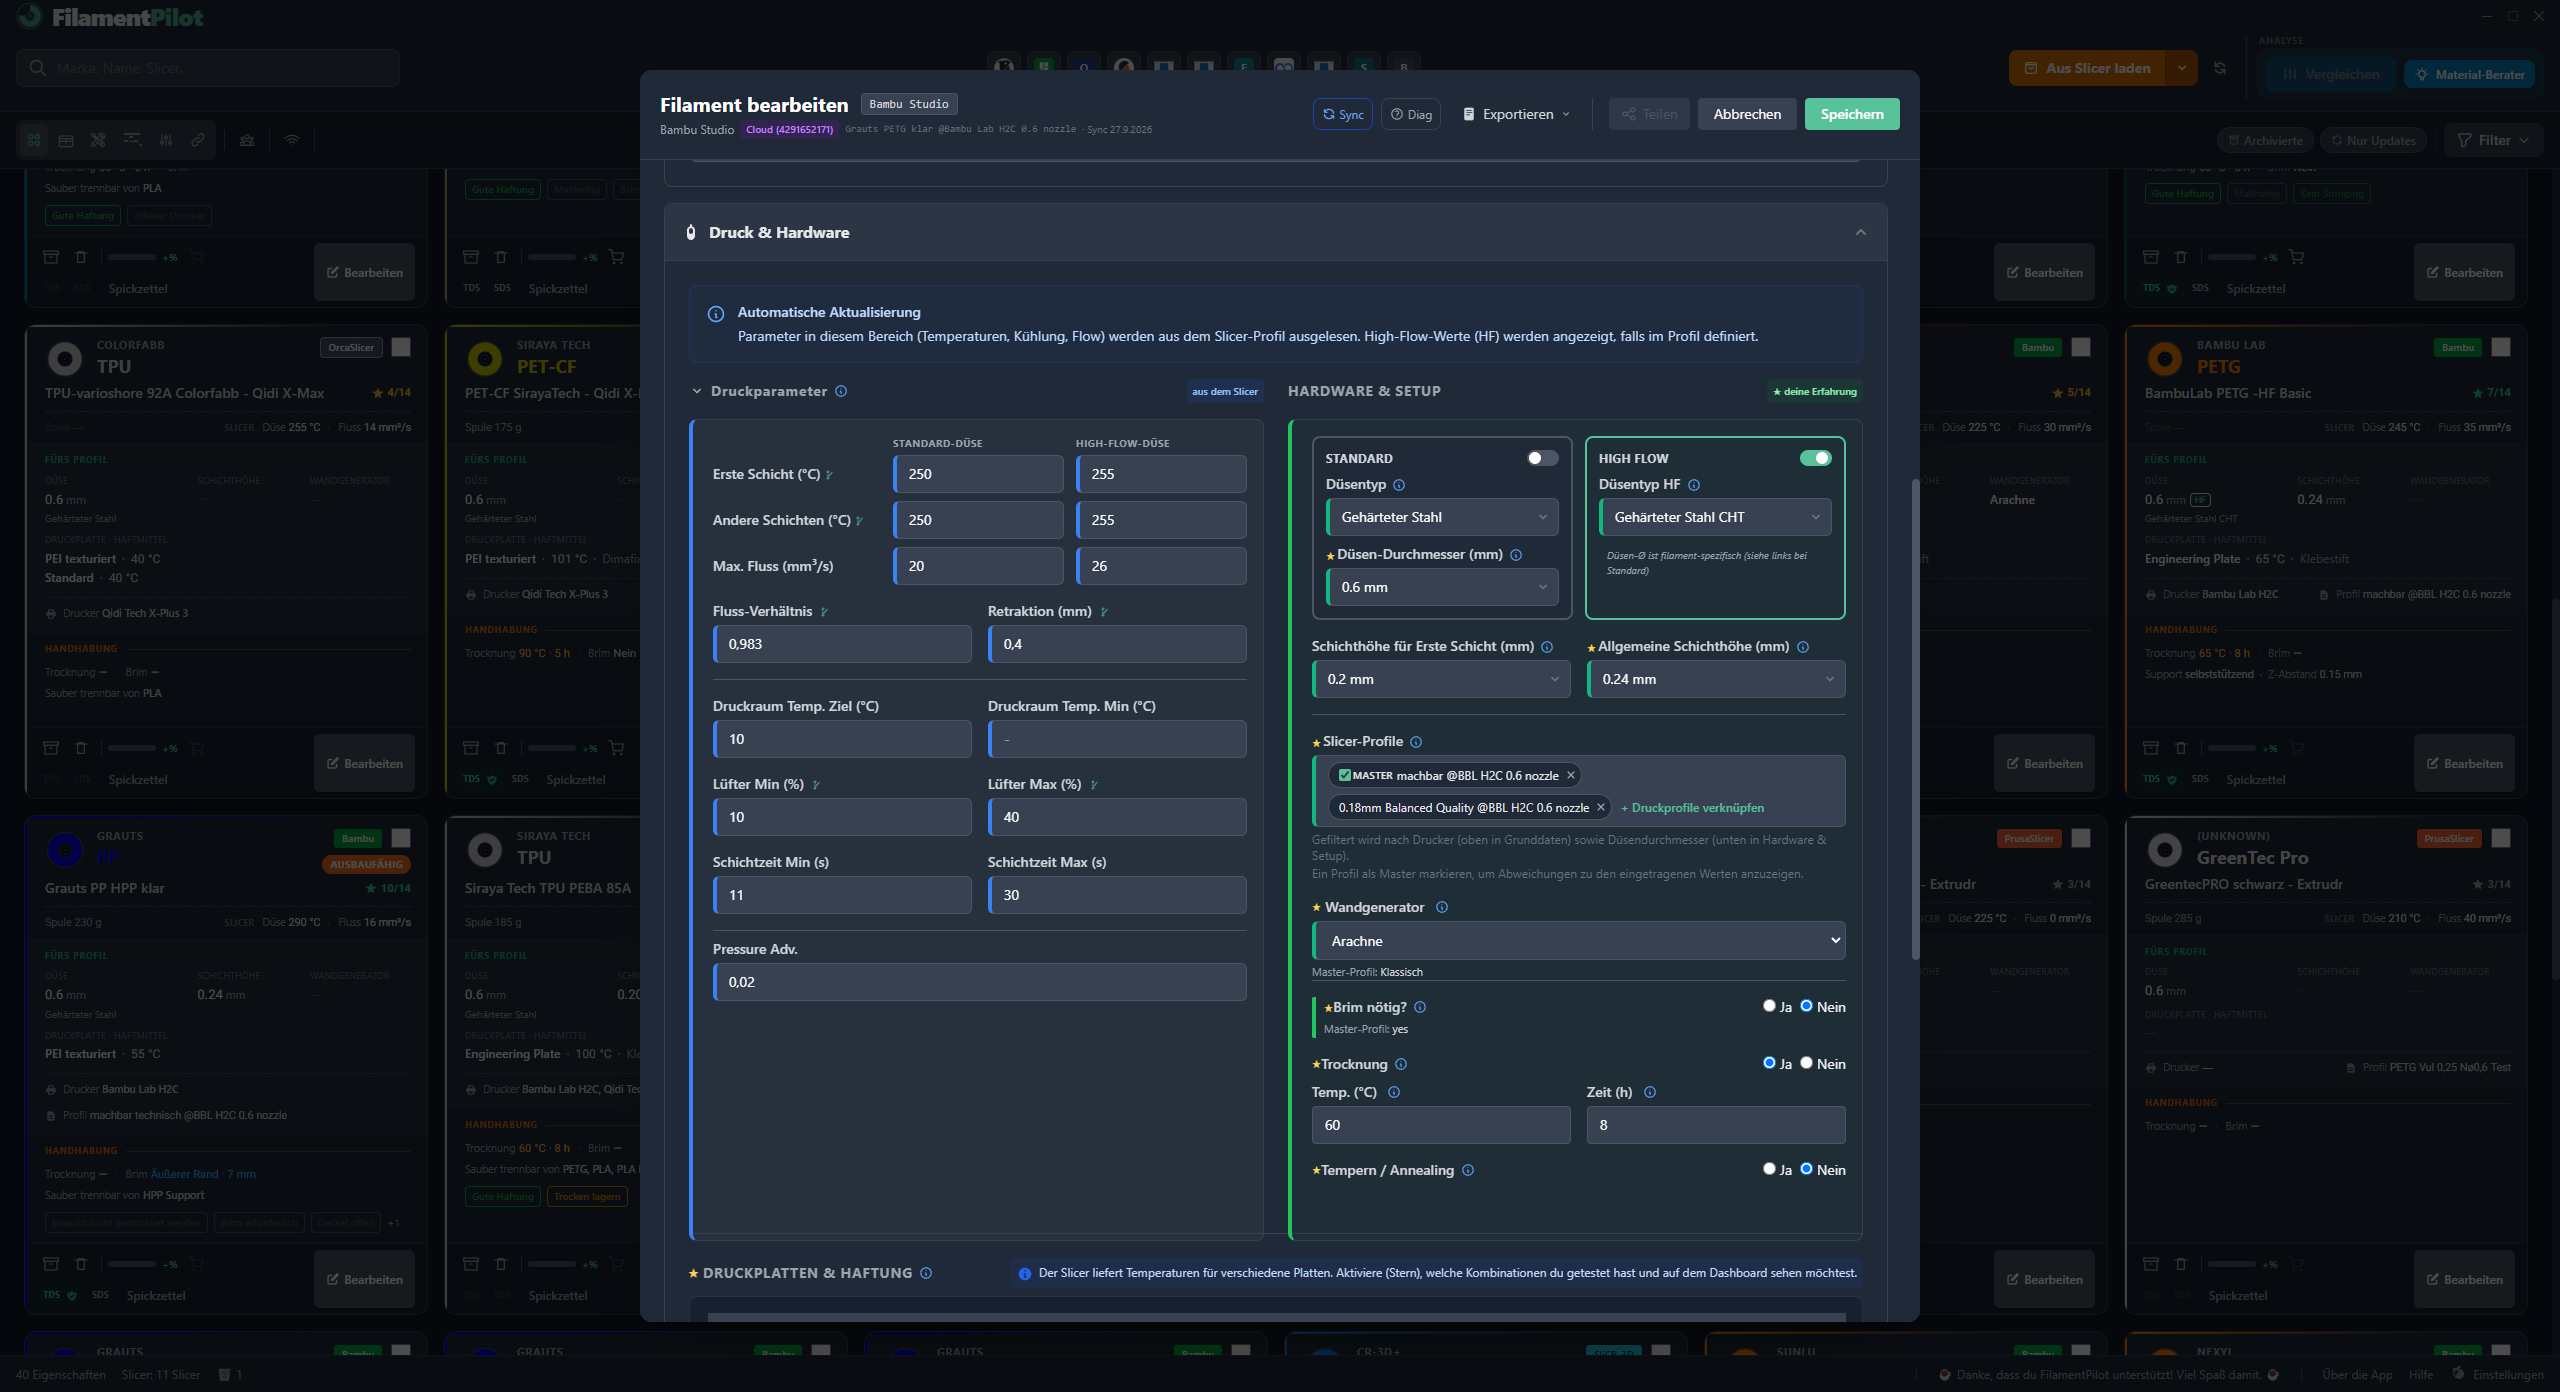
The master profile shows you when things drift apart.
You can link several print profiles to one filament — say fine, standard and fast, all for the same printer with the same nozzle. You mark one of them as the master.
Different nozzle size, different card. Switch from 0.4 to 0.6 mm and too many values diverge — layer height, throughput, support distance. For that, create a separate card and filter by it.
FilamentPilot then compares the values on the card with those from that profile and shows you the differences. That's how you notice when something changed in the slicer while your card still shows the old state.
Chapter 6 · Technology
What you should know about the foundation.
Where your data lives, what the app needs, which slicers it knows.
Runs on your computer
Windows 10 and 11. One installer, no account, no permanent internet connection. To work, FilamentPilot needs nothing but your PC.
Your data stays your data
Everything sits as a file on your computer or in your network folder. You can copy it, back it up and take it with you. No third-party server, no analytics, no subscription.
One folder for every computer
With the Workshop licence, every computer points at the same folder — network drive, router, or a USB stick plugged into it. What you enter on one is already on the other. Plus you can check it from your phone while the machine is running.
Updates, when you want them
FilamentPilot lets you know as soon as a new version is ready and installs it with your click. Purchased licences stay valid — buy once, use forever.
Supported slicers — reading and writing
Missing your program? Many slicers are variants of the ones listed — FilamentPilot searches for them itself at the press of a button and adds them.
Chapter 7 · For filament manufacturers
Your cheat sheet. Your brand.
What appears on your customer's printout — and why the datasheet and the cheat sheet serve two different jobs.

Logo and contact line
Upload your logo once, enter a multi-line company block: name, address, phone, email. The first line appears bold, like a letterhead.
Two QR codes
One leads to your website, one to reordering the spool. The path to the next order hangs right on the printer.
Printer series
Instead of individual devices, the cheat sheet names whole printer series — the kind of detail that fits a product datasheet. Also useful for printer manufacturers.
Your datasheet today
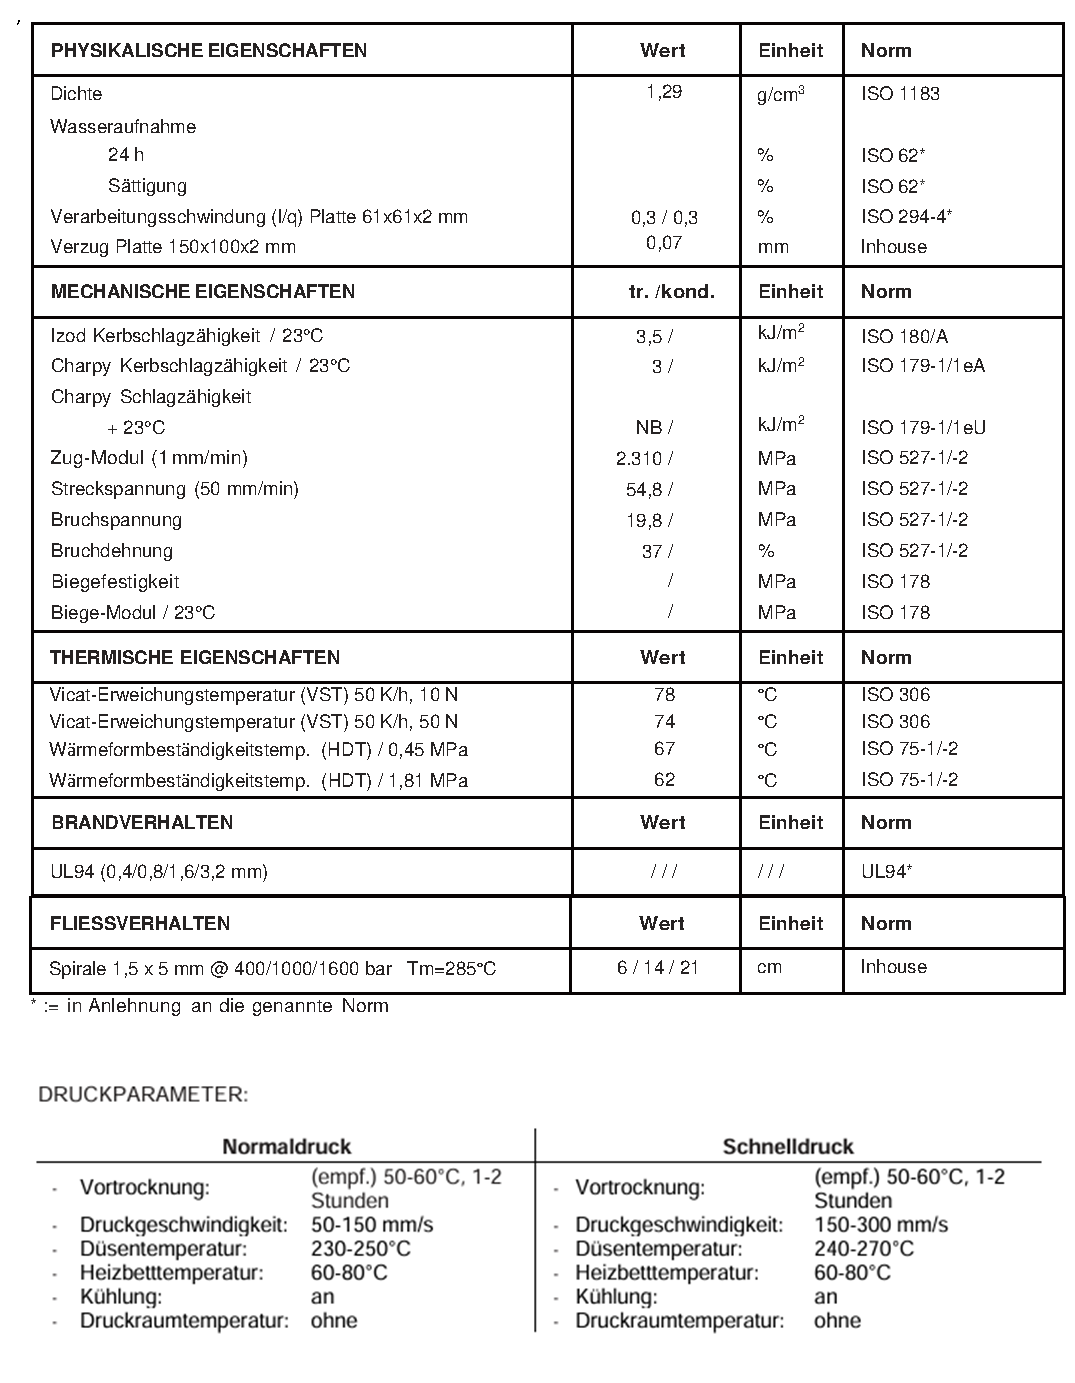
Says what your material is: lab values, temperature ranges, certificates. None of it can your customer load into a slicer.
Your cheat sheet in FilamentPilot
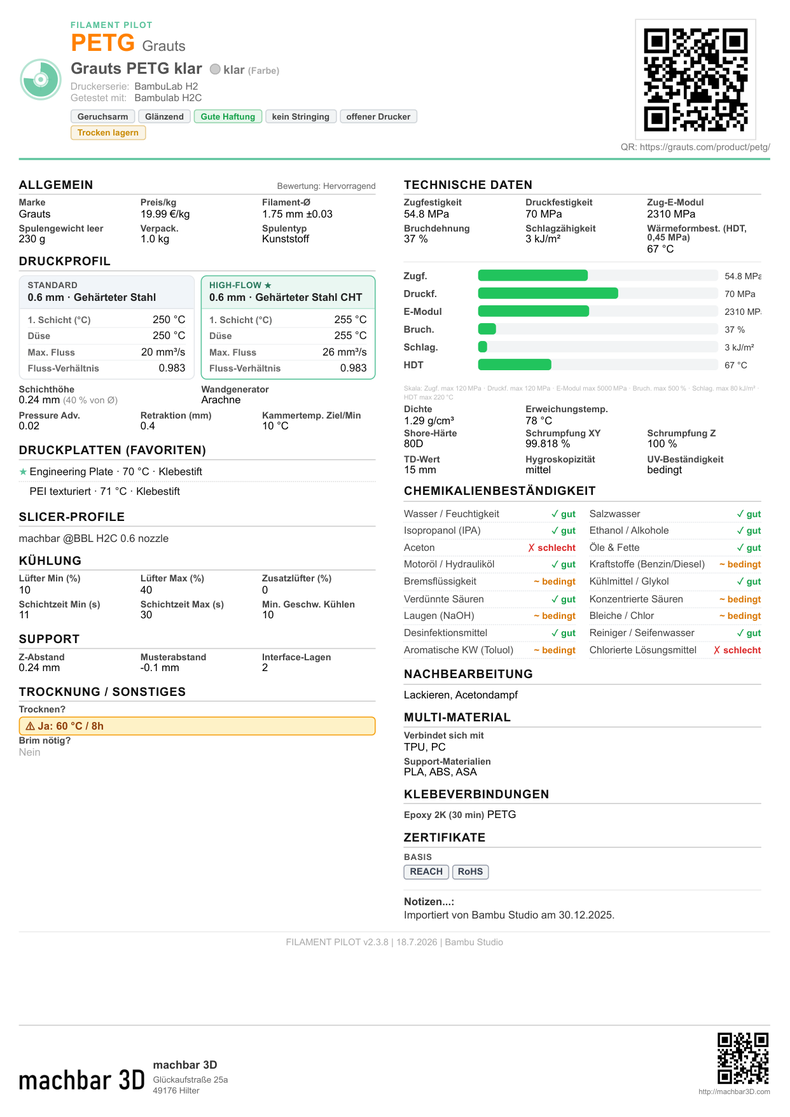
Says how to print it: concrete temperatures, build plate, adhesive, drying time — on one page, with your name underneath.
You need both. Until now, there was only the first.
You maintain your own profiles — no middleman, no approval loop, no platform between you and your customers. Company mode is part of the Workshop licence.
And what does your customer do with it?
Two clicks. Then your profile is in their slicer.
They need no account, no setup and no licence. Just FilamentPilot and your file.
You send the file
By email, as a download in your shop, or as a QR code on the spool. One file per material — the same one for every customer, no matter which program they use.
They open it
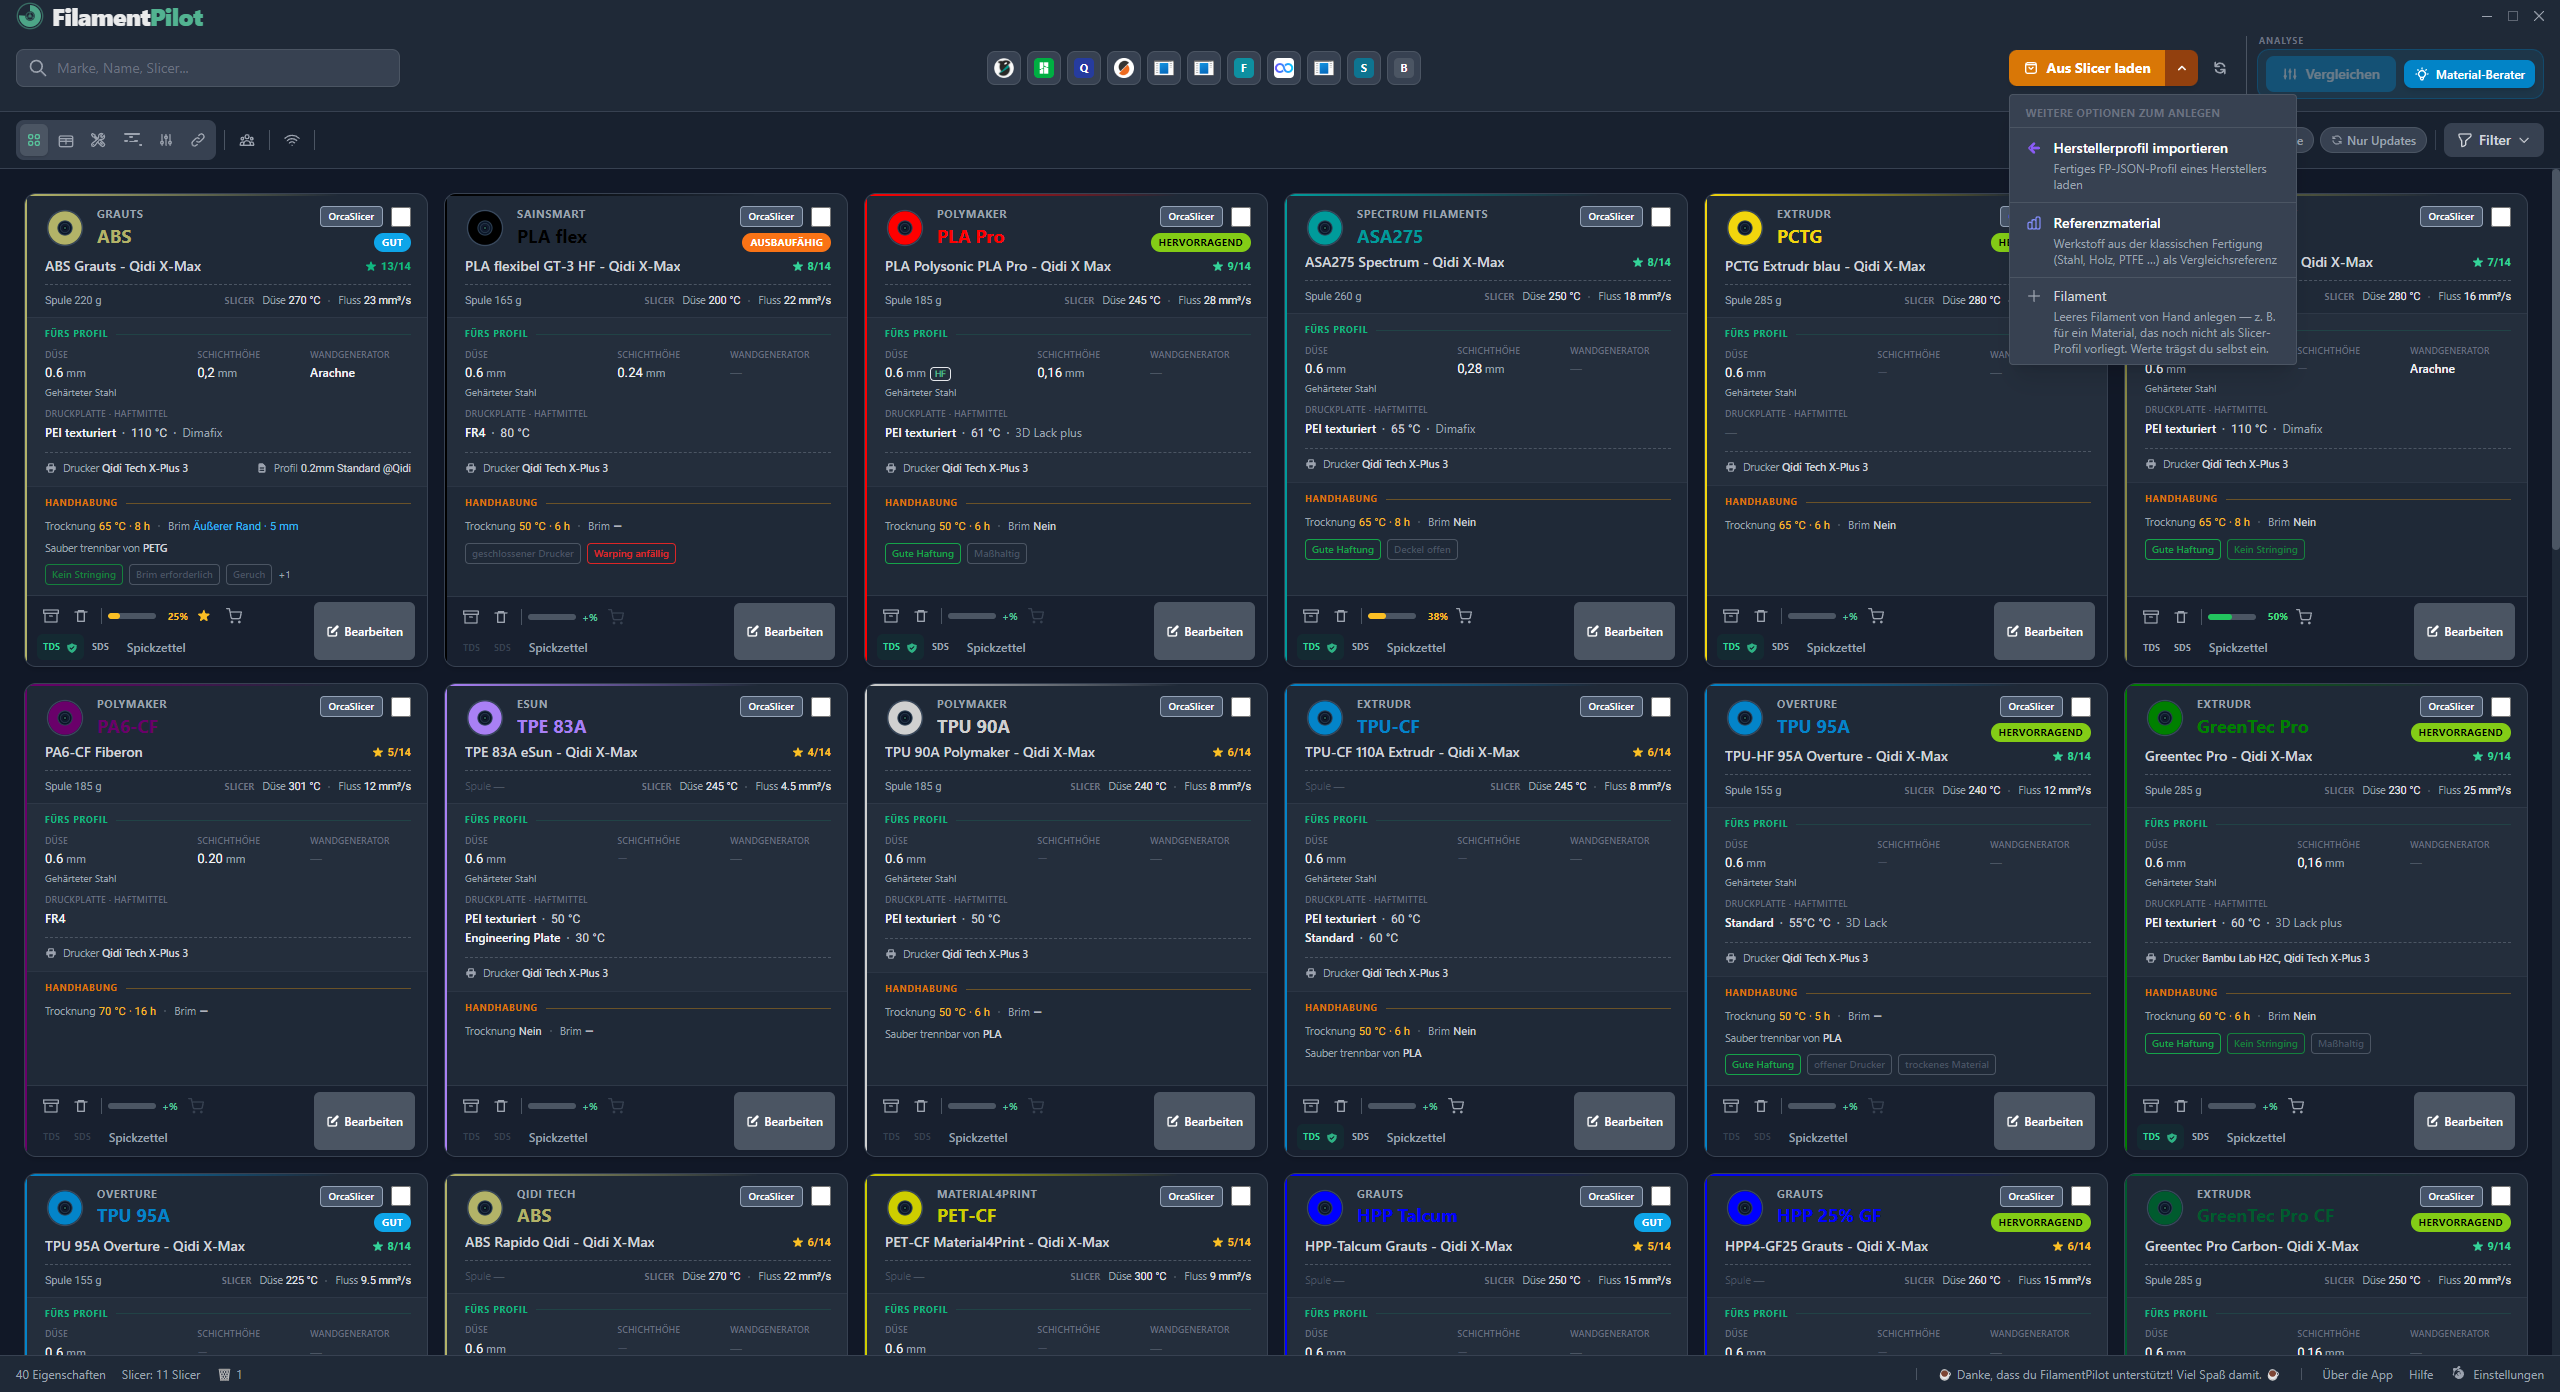
Top right, under "Import from slicer": Import manufacturer profile. Then they pick your file.
They pick their slicer
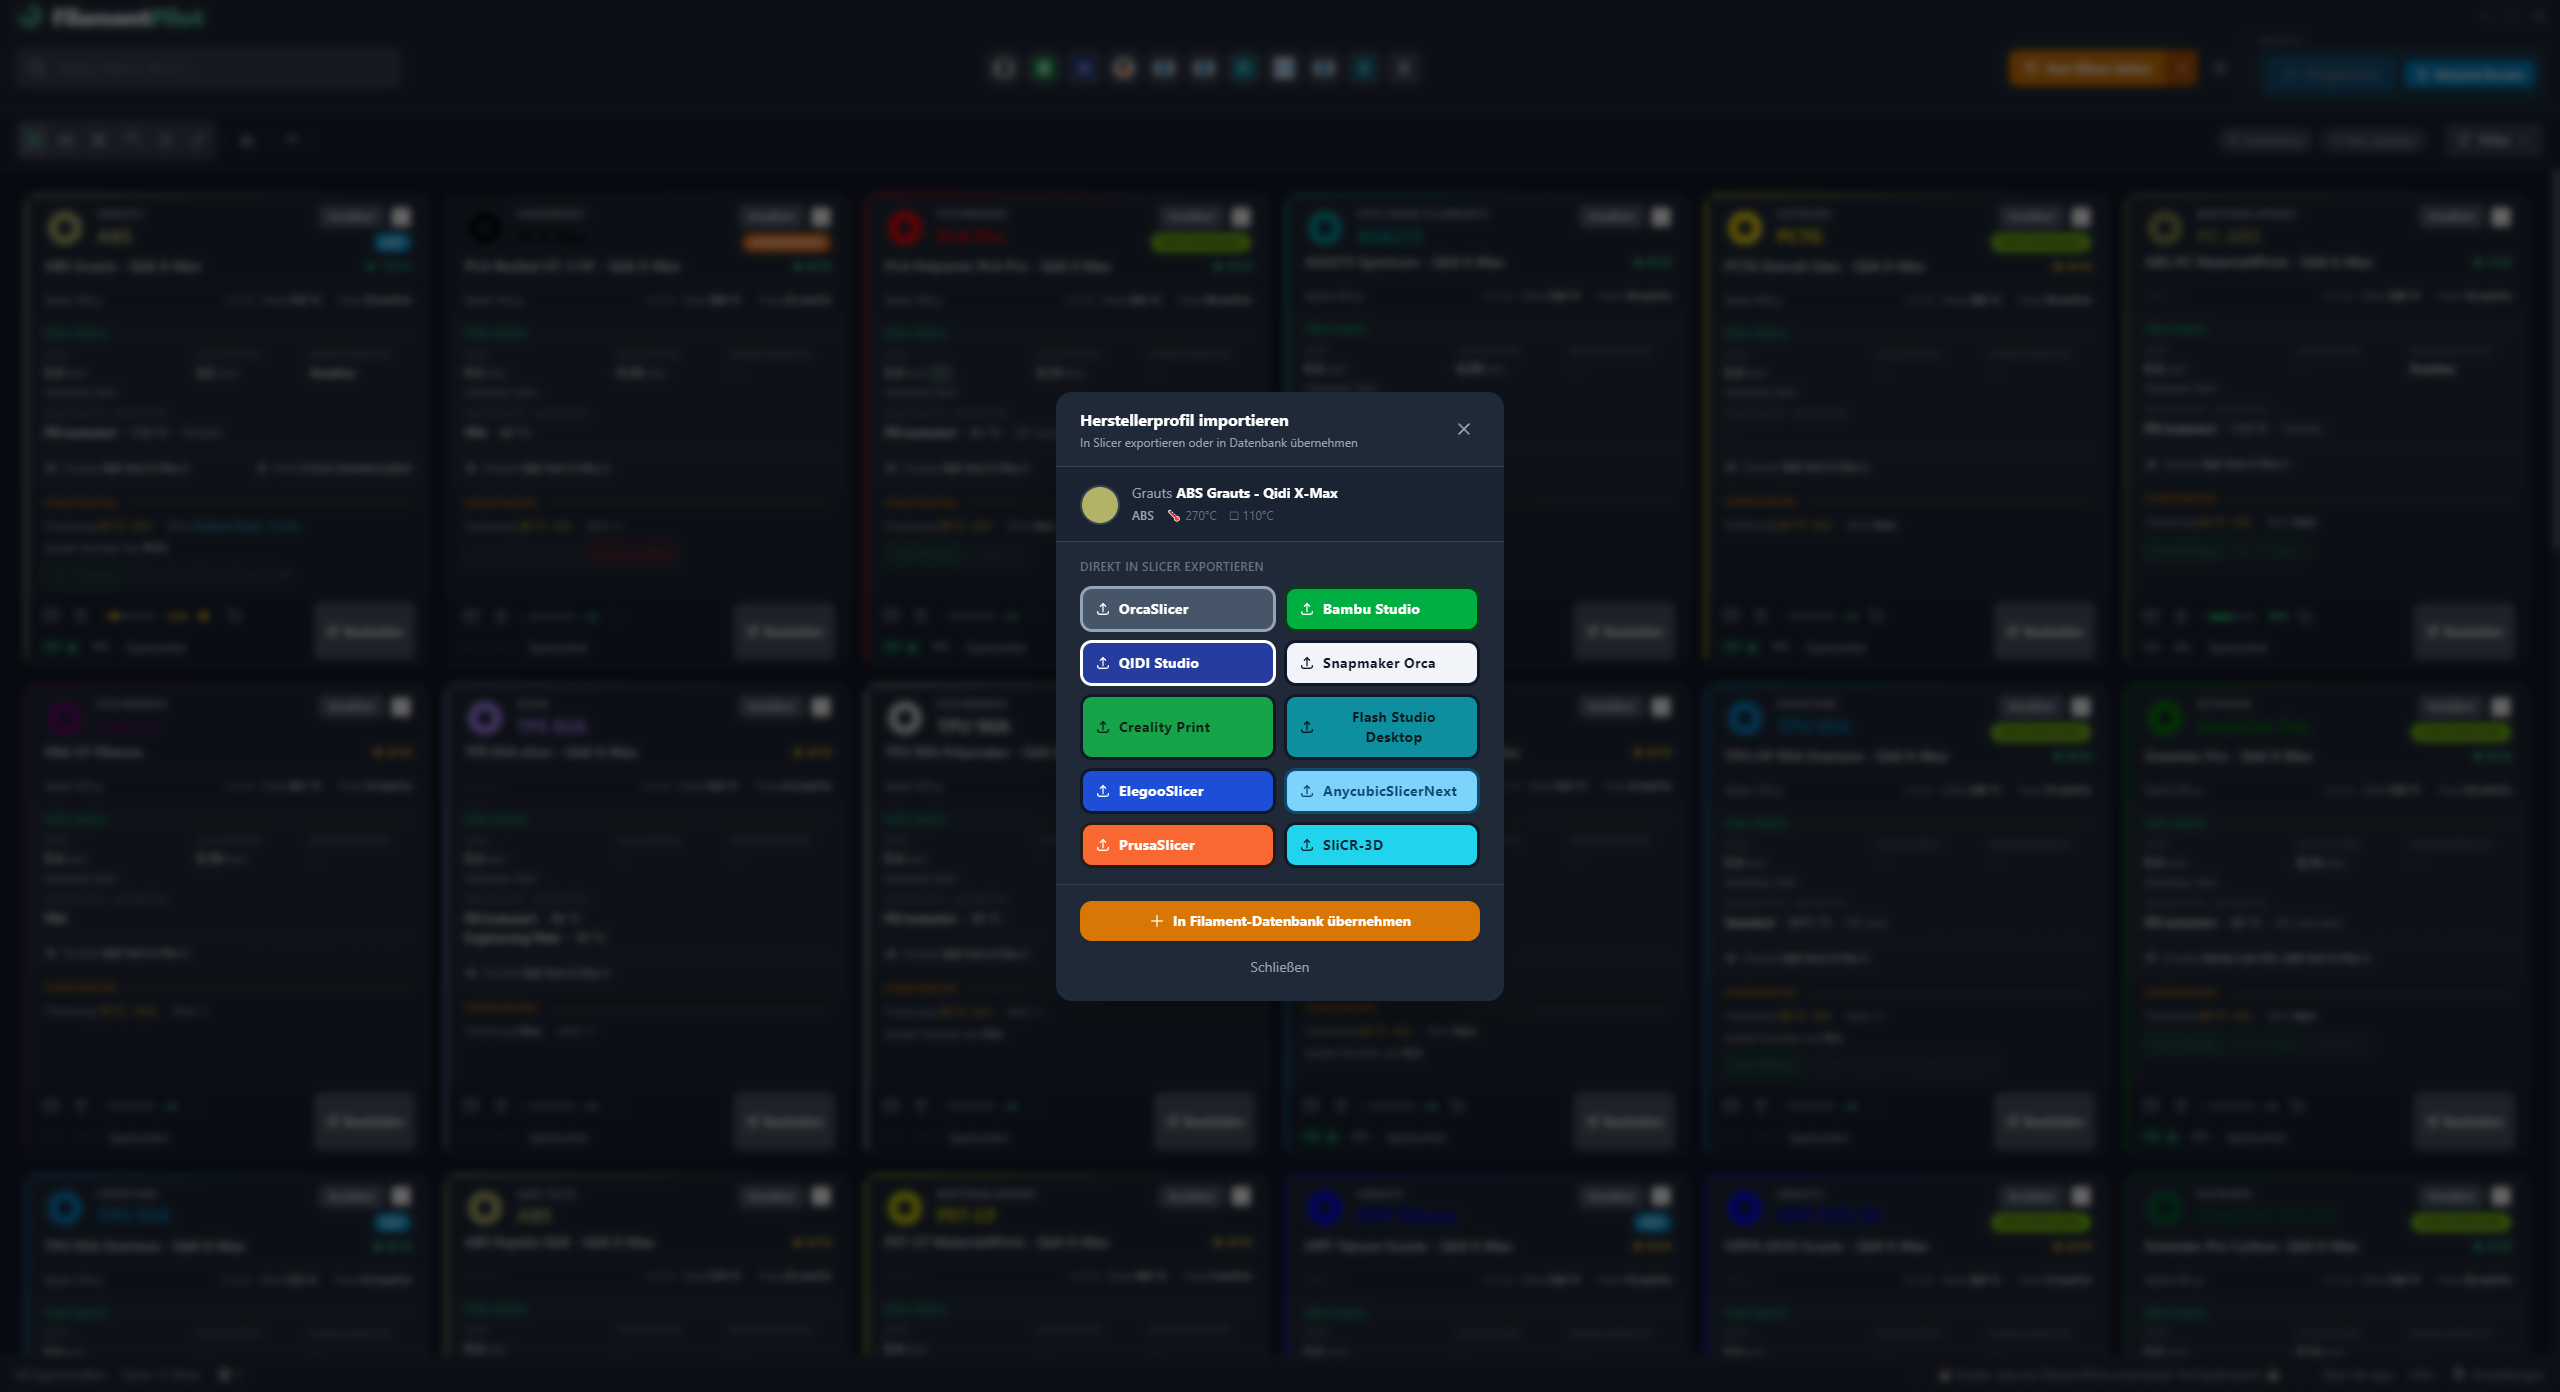
One click on their program — the profile lands where the slicer looks for its profiles. Or they adopt it as a card and have your values permanently in their reference book.
Your temperatures, your build plate, your drying times — arrive unchanged at their end. None of it is something they have to figure out themselves.
The best way is to try it yourself.
FilamentPilot costs nothing up to fifteen filaments. That's enough to see whether this approach fits you.